Showing posts with label Internet Tricks. Show all posts

How To Check/Block Devices Connected To WiFi Network

How To Check/Block Devices Connected To WiFi Network
In recent years, internet has become a necessity rather than a luxury. A huge increase in smart devices such as smartphones, smart TVs, home assistants, laptops, tablets contribute to the consumption of internet. Connecting each of these devices with a LAN cable would be really inconvenient and devices like smartphones do not have the space for a LAN connector. Meanwhile 4G or mobile data is too expensive to be used freely. But the good news is that we have a perfect solution. WiFi is complete wireless internet access over LAN. We can connect as many devices as we want to a router wirelessly by just entering a custom key.
The only issue that people face with the WiFi technology is that your network range can go beyond your limited property and people can connect to it from outside. Once you enter a key in a particular device, they can connect from anywhere within the range without you knowing. Hence, you might never know but people may be consuming your bandwidth and data and may also have access to your devices on the network without you even noticing. If you have your concerns, today we have the solution for you. Here, in this article, we are going to share ways in which you can keep an eye on what devices connected to WiFi network. You can do this from any of your devices may it be a PC, Mac, tablet or smartphone.

How To Check Devices Connected To WiFi Network.

Given below are the three best ways to check who is connected with my WiFi. You can use any way you find convenient and according to the device you are using.

1. Check Via Router.

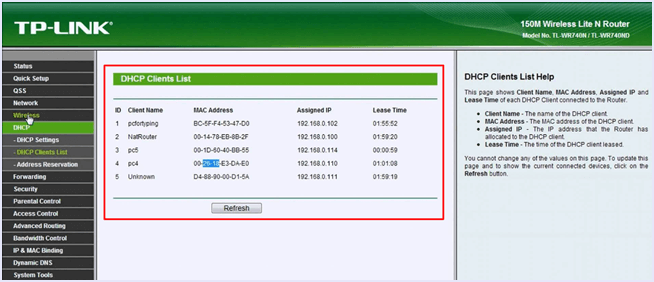
All routers have a way of showing and managing connected devices. All you need to do is access the page from its web interface. Just look for the IP address of your router which is of the format “192.168.X.X.”. After logging in, just look for Wireless status, or the DHCP Client list or connected devices. It depends on router to router. But here you will find all the connected devices along with their IP and Mac address.
dhcp client list wifi network connected users

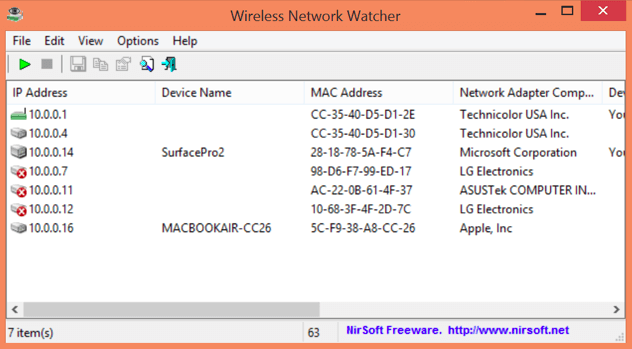
2. Check Via Network Manager Tool.

If you are on a Mac or PC, you can use a software to check your network, as well as monitor the devices connected to WiFi network. Some simple tools like the NirSoft’s Wireless Network Watcher offer viewing of devices connected, meanwhile advanced tools even notify users when a new device gets connected to the router. Although, you might need to spend a few bucks for such advanced functionality.
Download buttonnirsoft wireless network watcher

3. WiFi Kill Android App.

wifi kill pro appIf you are on Android, WiFi kill app is the one you need to check who is connected with my WiFi. It requires to root android phone but the features it offers are worth everything. The app allows you to see what devices are connected to your network, what their IP and Mac address is. You can also see how much data they are consuming and what sites they are accessing. This app gives you complete control as you can stop bandwidth of a device connected to your network right from this app.
Download From Playstore

How To Block Unwanted Devices Connected To WiFi Network.

Once you have spotted the people connected to your WiFi and you happen to spot unwanted users wasting your bandwidth, its time to stop them. Hence, we have the best ways for you to block devices connected on WiFi. Choose any of the method accordingly.

Method 1:- Mac Address Filters.

Mac address, also knows as physical address is a unique set of alphanumeric code that is set for each device. Each router or wi-fi modem recognizes a device using the Mac address. Here’s how to use it.
mac address filtering
Step 1. Open router configurations page and log in.
Step 2. Head to wireless status or DHCP client list as mentioned above to get the list of devices connected. Note down all the Mac address of the list.
Step 3. Check all the Mac address of your devices and mark the ones that you find unknown and suspicious.
Step 4. Look for Mac address filtering in wireless setting or security.
Step 5. Then, change rules to “deny the stations in enabled entries” and enter the Mac address you want to block below.
Step 6. Enable the Mac address filtering and restart the router if required.

Method 2:- Using WiFi Kill Pro.

WiFi kill not only allows you to see people using your WiFi but also gives you the power to kill their bandwidth and block usage from the network. Here’s how to do it.
wifikill pro blocking
Step 1. Open the WiFi kill app and provide root permissions.
Step 2. Then, in the list of connected devices choose the device that you want to block access.
Step 3. Tap on the “kill” button in order to stop internet usage on the device.
Note :- If you use this method, the device will not disconnect from the network, but it won’t be able to use Internet.
Hence, these are the three best ways to check who is connected with my WiFi network.
In conclusion, we hope that you find this simple guide on ways to check who is connected to WiFi and also ways to block devices connected to WiFi. For any questions or assistance, feel free to contact us. Also, share with us any other method you use in the comments below.

How To Combine Facebook Profile Picture And Cover Photo

How To Combine Facebook Profile Picture And Cover Photo
Whenever we hear the word social network, the first thing that instantly pops up in our head is Facebook. Facebook is without a doubt, the biggest social networking site on earth. It is one of the main reasons that got the masses to join the internet. Facebook has the highest active user base and no other site can compete to the traffic Facebook generates. This is because Facebook keeps adding new features and ways to keep people interested. But in spite of all the given features on Facebook, people look for ways to make their timeline unique and impressive. And we have great way to do it that we are going to share with you. The best feature of one’s Facebook timeline is the cover photo as well as the profile picture. These are the most notable things that are noticed the very first. Today, we will tell you how you can combine Facebook profile picture and cover photo to make them a single banner. This looks very beautiful and appeals to your visitors. If you crop manually, you won’t be able to combine your profile picture and cover photo. Hence, in this article we are going to give you a simple and easy to follow guide on how to combine your Facebook profile picture and cover photo. So let us begin.

How To Combine Facebook Profile Picture And Cover Photo. ?

Given below are simple and easy to follow steps on how to combine your Facebook profile picture and cover photo. Follow them and you can easily create a visual masterpiece for your Facebook timeline. We just have to upload the photo from which this service will cut down exactly same portion which will be used for profile and cover location and results as combination.

Steps To Combine Facebook Profile Picture And Cover Photo Are:

Step 1. Click the link given below to access the combine Facebook profile picture and cover photo tool.
tricked your timeline combine profile picture
Step 2. Then, click on “Merge profile picture and cover photo” option.
merge facebook profile and cover photo
Step 3. Now you have two options. You can either upload a photo or import your current Facebook cover pic. Choose accordingly.
upload import image
Step 4. Once the uploading is complete, you will be able to see a preview of your creation. If you are satisfied, click “Done”.
preview merged image
Step 5. Now, all you have to do is download the profile picture as well as the cover photo separately.
download profile and cover photo
Step 6. Then, upload the images you just downloaded to you Facebook profile as you profile picture and cover photo.
And now you have successfully combined Facebook profile picture and cover photo.
In conclusion, this is the easiest method to combine Facebook profile picture and cover photo. Share your profile with as and tell us your experience in the comments below. All your suggestions are welcome.

Top 10 Tips To Make Browsing Speed Faster

How To Make Browsing Speed Faster
Today with the advancement of technology, Internet is used everywhere. Internet provides a medium to connect devices and networks to each other and allows sharing of resources with each other. Internet is used in every field like Banking, Business, Education, Entertainment, Online shopping, Internet Marketing, Advertisement etc. Internet can be accessed on a computer through a web browser. Web browsers provide an interface to access content over network. When we open a web site, our web browser sends a request to web server and the response to our web browser is in the form of web pages. Now-a-days everyone requires fast internet speed to get their work done fast and save their time. Even while using a fast internet connection sometimes the web browsing experience may not be very pleasant due to browser compatibility issues and some hardware related issues. As we can boost internet speed by reducing data usage But do not worry, if you are experiencing a slow web browsing speed on a fast internet connection, we have the solution to make browsing speed faster. Listed below are some of the most useful tips and tricks to speed up your web browser.

How To Make Browsing Speed Faster.

1. Use Virtual Ram For Better Performance.

We know that every application runs in RAM and data processing for that app takes place in RAM. If you have small RAM then it can not process your data and webpages and run your application very well simultaneously. Most browsers today require high RAM memory for functioning properly. If you do not want to purchase new ram sticks, you can also use your pendrive for readyboost purpose to make browsing speed faster.
Pendrive as ram

2. Close Unwanted Applications.

Most heavy software’s like Adobe Photoshop, Games and background processes consume large amount pf RAM memory. Hence, it is always advised to close all the unnecessary applications open in the background while browsing the internet. You can also hit refresh a few times. This allows more system resources available for the processing of web pages leading to faster web browsing speed experience.
close extra apps task manager

3. Use New Tabs Instead Of New Windows.

Mostly people when surfing internet open a new a link in new window instead of using a new tab. Switching between tabs takes less time while switching between windrows is more time consuming. Also opening a new window will utilize more system resource in terms of RAM while opening new tab will use a new thread only.
open in new tab

4. Update Your Browser.

It is possible that you may be experiencing slow internet browsing due to an outdated browser. Most users make the mistake of not updating their web browser leading to incompatibility with new web pages as well as slow browsing speeds. Hence, we advise you to use the latest up to date version of your web browser.  You can always check for updates under “Settings >> About” in your web browser.
update firefox

5. Use Minimum Extensions.

Firefox and Google Chrome provide great option for all its extensions, but when you use a lot of extensions then they can cause the browser to get slow and buggy. Hence, to increase the speed and efficiency of your web browser, you must disable the unnecessary extensions. This will keep your web browser light weight and snappy.
6. Remove Extra Toolbar.
If you want to make browsing speed faster then you need to remove extra tool bars from your browser because some tool bars simply take up precious computer memory while others eat bandwidth by simply sending and receiving data in background. Most free toolbars that automatically get installed on your web browser are usually full of malware and slow down your web browser. If you don’t want to  compromise your browser speed then you must remove extra tool bars from it.
toolbars

7. Disable Flash.

Adobe flash format is available everywhere on the internet. Many animated advertisements are designed to run via Flash. But Flash is slow and hence, reduces the speed of web browsing. So, we suggest to turn it off when you don’t need it. Internet explorer provide default option to turn it off while Chrome and Firefox have extensions to turn it off.

8. Protect Your System From Virus.

One main reason for the lag in your web browsing experience on a fast internet connection may be due to virus on device. Virus slow down data processing and mess with the usage of bandwidth. Therefore, reducing the web browsing speeds on your device. We recommend you to check for virus on your device by using any trusted antivirus app that you like.
antivirus logos

9. Turn In  Prefetch Resources.

Many browsers have the intelligent feature of resource pre-fetching. what this feature does is that it enables the browser to intelligently decide what links are most likely to be opened next by the user and pre loads a part of the next webpage and keeps it ready to be shown. This make browsing speed faster by a great extent.
prefetch resources

10. Clear Cache, History and Cookies.

This is a great trick to do if your web browser shows some lag while browsing or your web pages are not loading properly or you suddenly feel that your browser is glitchy. Just head to the settings of your browser and under history, clear Cache, History and Cookies and just restart your browser.
clear cookies cache
In conclusion, These are some of the most effective ways to quickly speed up your web browser and get a better experience to make browsing speed faster on your device. If you need any help, or have a suggestion for us, please share it with us in the comment box below.

How To Change Your Facebook Name Before 60 Days After Limit 2017

Hello Friends In This Post I will Share with you That How To Change Facebook Name Before 60 Days After the limit. Facebook Is the best Place to Chat With your Friends and intact with your friends By the chatting On Facebook Group. You Can Also Do Free call by using of Facebook Messenger. Facebook Basically allow us to change name only one or two time in 60 days But By Using this method you can easily change your name before 60 days. By Using Facebook We can also know easily What’s in the trends and Viral. Facebook Is basically use to share their memories, status, Images and photos etc. but for Making A Facebook account we have to provide some information like email ids Mobile numbers thats it these are much sufficient As well as we have to also provide personal information [Date of birth, Name, Profile Pictures, Bio, HomeTown] By which Friends can easily search my profile.


Change Your Facebook Name Before 60 Days After Limit 2017


Change Your Facebook Name Before 60 Days After Limit 2017

Procedure to change facebook name Before 60 day’s After Limit.

First Of All Go to Setting then Click On General Account Setting And Click Edit Name Then Confirm That Limit Is currently present Or Not.
If The Name Limit Is present then You are not able to click On name. and their should be a note About Name Change limit, Which are:-You can't change your name at this time because you've already changedit within the last 60 days
After The confirming Limit If you want to continue the changing name then follow the some steps below
  • Firstly Go to here Change Facebook Name.
  • Then Click On Continue Button, You are not able to click on your Name.
Change Your Facebook Name Before 60 Days After Limit 2017

Change Your Facebook Name Before 60 Days After Limit 2017

  • After that change the password but no need to change any other information ( Email Id’s, Mobile Number. Etc)
  • After Click On next they will show message that you have Recently Changed Your Account Name.
  • then all the previously used names will displayed which are you used earlier and select any of the listed name available there.
Change Your Facebook Name Before 60 Days After Limit 2017

NOTE:- By Using This Method You Can change your name Unlimited Infinite time. But you are not able to Use New Name. But This Is enough for Us.
Thankyou If you want any time of help or not able to change then feel free to comment here I will try my best to solve your problem. So lets follow above guide on how to change facebook name before 60 days trick.

Final Verdict

So Guys, By using this Easy guide you will know the fb name change limit hack. So just follow above step by step guide for change fb name after limit – & – remove limit forever. if you face any problem then simple Comment in below.

Convert Any Webpage or Word Document Directly into PDF

Many times when we are randomly opening pages of some websites or going through different sites , we see some topics which seems really interesting. Often when we are looking for some particular topic , we reach to some other post which is interesting too but we have to continue to our search and leave that page half heartedly. Many of you might be aware of the default option provided by browsers for saving web pages to your computer and read them later while you are offline . You can do it by using option “ Save Webpage As…”
convert webpage into pdf

But these web pages saved by this method are not that good quality files. When reading , it seems that we are still looking at the website and not in our computer. So today I am going to tell you a trick to Convert Webpage to PDF and saving it to your computer simultaneously.

HOW TO CONVERT ANY WEBPAGE TO PDF


There are two very simple and automated methods to Convert Webpage to PDF format.

METHOD 1 : PDFMYURL.COM

Pdfmyurl.com is a website that provides service of converting any webpage to pdf format and make it available to save on your system free of cost with the blink of your eye. It is very fast .
All you have to do is Simply open PdfmyURL website and paste the desired URL or website address which you want to convert to pdf and click on button placed at right side of text box. It will convert that URL into pdf format and ask for saving to your system.

METHOD 2 : USING NOVA PDF

You can convert webpage to pdf from popular browsers like Internet Explorer, Firefox, Opera and Chrome by installing a Nova PDF creator that works as a virtual PDF printer. Once the printer is installed, you can simply print to it and a PDF file will be generated.
Just Download this software from their official site here : DOWNLOAD
Install it to your computer and then it will automatically add a new option to your browser’s print button i.e. Nova print server . Select it and click on print. It will save that url as pdf. You can also set margins of page using page setup before downloading the pdf to set the size of pdf file you want.
So this was all about saving a web page as pdf document now I would also like to tell you about How to convert word document to pdf file.

It is a simple task to convert any word file to pdf file. It can be done online or by some software. The best way to do it is using wordtopdf.com
This site will do your work in three simple steps. Browse your file , Enter your email address , click on convert it and within a few minutes the converted pdf file will reach to your inbox. There are many other sites as similar to wordtopdf.com so if this site doesn’t work for you , simply google it.
Above methods guides you to Convert any webpage or word documents to pdf format easily.

How To Surf Internet Anonymously !!

Everyone today surfing on internet is very seriously concerned about their Privacy. As the Cyber crime is increasing day by day, those who are not doing anything to hide their real identity must perform some necessary security actions so that no one can harm them online.
anonymously
So here in this article, I am going to share with you some internet tips to browse and Surf internet anonymously.

4 BEST WAYS TO SURF INTERNET ANONYMOUSLY


1. USING SOFTWARES :


Software

There are several softwares available for personalizing your network connection and use a middle layer between you and your real network. It creates a virtual environment between the user and their internet connection. These are most popularly known as VPNs (Virtual Private Networks ). A VPN connection across the Internet is similar to a wide area network (WAN) link between the sites. From a user perspective, the extended network resources are accessed in the same way as resources available from the private network.
The high quality VPNs are normally paid which provides privacy to industries and other business organizations. But for normal users there are variety of VPNs available for free.

2.USING TOR BROWSER :

Surf internet anonymously
Tor browser is one of the leading and best known browser for anonymous surfing over the internet. It changes your original ip address to the ip address of some remote location. No one will be able to see your real ip when you surf sites using Tor browser. It looks much similar to Mozilla firefox but it reduces the speed of your internet connection upto some extent because every site which is being opened must be opened through the server of TOR organization.
You can download TOR Browser from their official website.

3.  SET PROXIES IN YOUR OWN BROWSER :

You all might have known the process of Setting proxy in your browser. We commonly do it when we need to access the internet using some public or shared wifi in offices or educational institutes like colleges etc.
They have always secured their network using these proxy setting and if you want to access internet via their network, you must change your browser proxy settings according to their settings. You can make your own home network more secured by doing the same thing.

4. USING PROXY SITES :

If you don’t want to download and install any softwares or VPNs on your system for privacy, you can simply switch to these proxy sites. All you have to do is simply enter the desired URL in the input box given on the website instead of your browser’s address bar. These sites offer you online privacy for accessing web anonymously. Moreover these sites will provide you access to those sites which are blocked in your office or college. Proxy sites have ability to bypass the filters that restrict the access to several sites.
You can try these sites :

How To Download Torrent Files with IDM

Torrent use is very popular these days. Whether you want to download a large file, or even a small one, you can use a torrent to download your desired file. In order to download the files, you need seeders and leaches. The more seeders, the better because you get faster download speed. The lower the seeders and leaches count, the slower the speed. You can Download Torrent Files With IDM yes you heard it right.
How To Download Torrent Files with IDM

In this tutorial, you will be shown how to Download Torrent Files With IDM. IDM is a very popular download client that helps you download many files at once, but also accelerates the download process. If you especially want to download very large files, IDM can come in very handy because it separates the file(s) into parts and downloads the smaller parts in accelerates rate. Once everything is downloaded, the smaller files are put back together into the original file you intended to download. Fairly simple, right? Now lets move onto how you can Download Torrent Files With IDM .

STEPS TO DOWNLOAD TORRENT FILES WITH IDM


Step 1: Select any Torrent download client such as utorrent or Bittorrent. You can use these clients to download the Torrent files onto your computer.
Step 2: Go to a Torrent uploading site such as ExtraTorrent or zBigz.
In this step, you will be uploading the Torrent you downloaded earlier.
Step 3: Upload the Torrent using the sites stated in the previous step, or if you have a site of your choosing, go from there. Make sure to use the “Free” uploading option. Assuming that you don’t want to pay for an account, just go with the free option. Do note that if you go with the free option, there are limitations set by the website. If you go with a premium account, some extra perks are provided.
Depending on how big the Torrent is, that’s how long it may take to upload. It also depends on how fast your Internet connection is. The faster your connection is, the faster the upload speed will be.
Step 4: Once you have uploaded the Torrent, there should be an option for you to “ZIP” the Torrent. Normally, there will be extra options to download the contents of the Torrent file individually, but for now, lets go with the “.zip” option.
Step 5: Once everything has been zipped in the “.zip” format, hit download.  Internet Download Manager  should pop up and automatically take over the download process instead of your browser.
This may seem like a bit tedious process, but it’s well worth knowing that you can download the Torrent through a ZIP file format without having to worry about increasing or decreasing connection speed. More people these days are using this process in order to speed up downloading and uploading of Torrents.
If you liked the tutorial on Download Torrent Files With IDM, please leave a comment below and let us know what you think.

Gadget