Showing posts with label PC Tricks. Show all posts

How To Protect WiFi Network From Hackers

How To Protect WiFi Network From Hackers
Today everybody use computers, mobiles, tablets etc to get their work done fast and easy. Internet provides a way of connecting with other networks and devices to share our information with others. Today internet is our basic need because internet is used in every field like Business, Banking, Education, Entertainment, Marketing, Advertising etc. Wireless internet is more popular type of  internet. WiFi is most commonly used method for wireless internet. WiFi uses radio waves to transmit data. Wireless network reduces the overhead of wires and maintenance. But with traditional wired network it used to be difficult for some one to steal your band-width but the main problem with wireless network is that people can penetrate into your network and use internet using your WiFi connection when they are near about your home or even your neighbors can waste your band-width. This will increase your bill, decrease your internet speed and also hack your personal computers. If you are using wireless internet connection and you do not know how to protect WiFi network from hackers then do not worry because in this article we have explained about some tips to protect it from unauthorized access.

Amazing Tips To Protect WiFi Network From Hackers.

1. Create A Unique Password For Your WIFI Router.

Every router has a default username and password that is used to enter the configuration menu of the router. The default credentials can be easily found on google and are usually “admin” and “password”. Hence, it us very important to change it so that no one can make changes in your network settings and effectively protect WiFi network from hackers.change router password

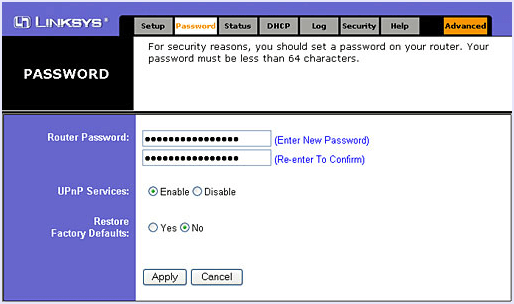
Steps To Change WiFi Router Password Are:

Step 1. Open your router setting by typing 198.168.1.1 or 192.168.0.1 into the address bar of your browser.
Step 2. Then log in into your router by using your user name and password. The user name and password are given in manual of your router and this different for each router manufacturer.If you lost your router manual then you can find the default password of your router on Google.
Step 3. After logging in into your router, change the default username and password for your router under administration settings so that no one access your router directly.

2. Filter Mac Address.

Every device that connects to the internet like computer, laptop, mobile, etc. has a unique MAC address or Media Access Control or Physical address of device. For increased security of your wireless Network we can add Mac addresses of all our devices to our router setting page so that only the specified devices can connect to our WiFi network. In this way we can protect WiFi network from hackers and internet stealer who you many techniques to connect automatically to WiFi.

mac address filtering
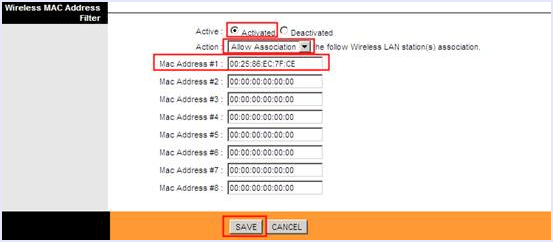
How To Get Mac Address Of Your Device ?

  • For PC – Open command prompt by typing cmd in search bar. Type ipconfig/all in command prompt and press enter. Now you will see the physical address of your device.
  • For Mobile devices – You can find the MAC address of mobiles under “Settings”.

3. Encrypt Your Network.

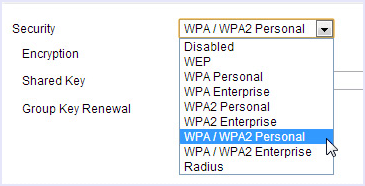
To Secure WiFi network from hackers and data stealers you should encrypt it by using the wireless security settings in your router setting page. The encryption method available for wireless settings include WEP, WPA, WPA2 (WiFi protected access version 2).  WEP provide basic encryption therefore it is less secure but it is also compatible with various devices. WPA2 is more secure but is compatible with devices starting from since 2006. If you use new device use WPA2 setting and use a phrase which is a combination of numeric and alpha numeric characters to access the network.
wifi encryption

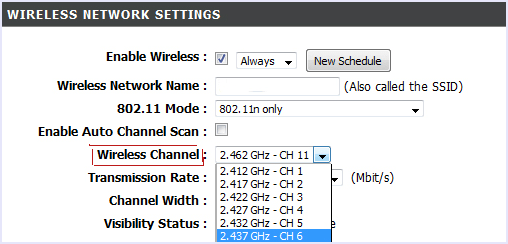
4. Adjust Your WiFi Network Range.

If you are living in a small house or in a apartment then you can reduce the range of router to prevent it from unauthorized access. We can reduce your router range by changing the mode of your router to 802.11g instead of 802.11n or 802.11b. You can also try to place the router inside a drawer or a box to reduce its range.
reduce wifi range

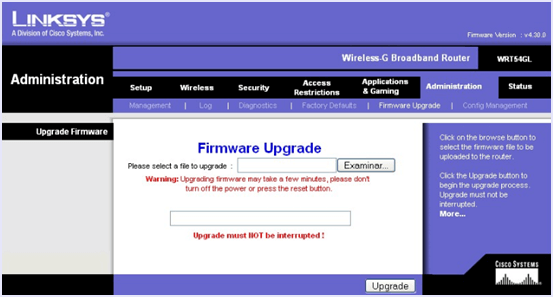
5. Upgrade WiFi Router Framework.

You should use the latest version of your router framework. For this you should periodically check the manufacturer site to update you framework version. You can check your current version of router framework at 192.168.*. from your router dashboard.
router firmware upgrade

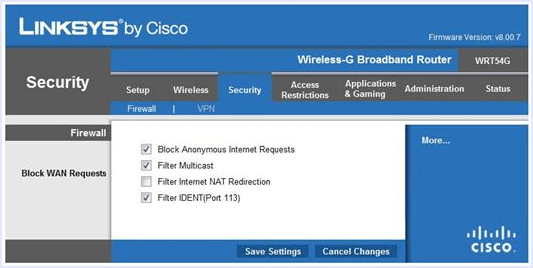
6. Turn On Router Firewall.

Most users use the Windows Firewall on their PC to protect them from unauthorised access over the network. But with mobile devices on WIFI networks, it becomes rather important to have another layer of protection. Hence, you must enable the Firewall in your router. Most good quality routers have Firewall settings built right into them. You can enable it by Loggin in to your router and then going to security settings. If your router doesn’t have Firewall inbuilt, you can also download various 3rd party Softwares to do so.
router firewall

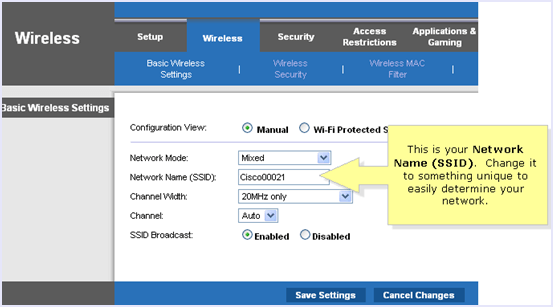
7. Change Network’s SSID Name.

SSID of our wireless router is predefined according to router brand name we are using. Hence, SSID reveals the brand of router you are using which reveals all the default information for your network and its vulnerabilities as well. Therefore, you should always change the SSID of your Wifi network to make it more secure. This setting is under the basic wireless setting at your router setting page. Do not use any personal information as SSID name.
change ssid router

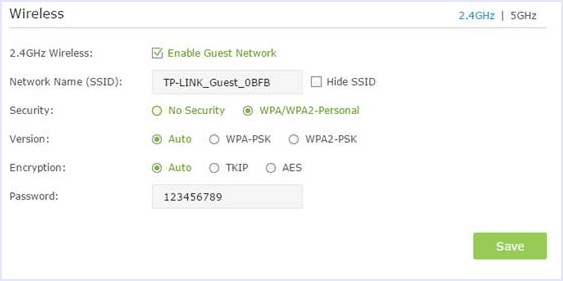
8. Turn Off Guest Networks.

Most routers offer the feature of adding a guest network to allow temporary users to connect to WiFi and have internet access without telling them your networks real password or giving them permanent access to it. But you should turn it off to make your WiFi more secure as people in tue range of your WiFi network can also use tue guest network and probably misuse it.
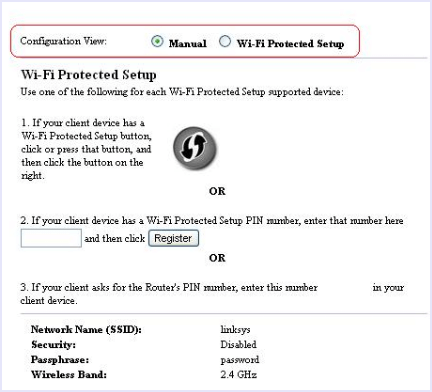
turn off guest network

9. Turn Off WPS.

WPS or WiFi protected system is a technique to connect to a WiFi network without the password. All you need to do is press a physical button on the router and on the device to make an instant connection, or simply enter the WPS pin. This means that anyone with physical access to your router can connect to the network. Also, the pin is also not very secure and can be hacked in some hours. Hence, it is advisable to turn it off to protect WiFi network from hackers.
turn off wps

10. Hide Your WiFi SSID.

The best way to hide your WiFi network for others is by not broadcasting the SSID. If you want to add a device, simply type in the SSID and Password on the device. As the network doesn’t show up in any WiFi scans and searches, it is very unlikely that it’ll be targeted by any hackers or intruders.hide ssid
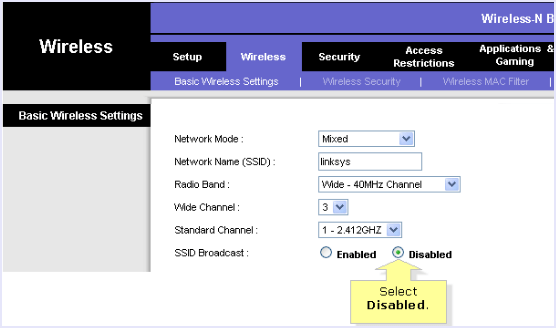
In conclusion, one can never be too secure with technology. Thus, we advice you to take all the necessary measures to make your home and office Wifi network as secure as possible. If you have any suggestion to protect WiFi network from hackers, feel free to share it with us in comments below.

How To Create & Manage Hidden Account On Windows

How To Create & Manage Hidden Account On Windows
Windows is powerful operating system designed by Microsoft Corporation for computer system. Windows provide many types of features and constantly upgrade its versions for more functionality and new features. User account is one the most popular Windows features which is designed for the purpose of privacy and security. With this feature a computer is shared  among multiple user with their own settings. By default Windows provide one administrator account which is hidden but we don’t know about creating hidden account on windows. Some time we need more than one account with admin privileges for different reasons. But we don’t know how to activate and deactivate them in hidden way. Alternative we can hide drives and even we can use folder lock software to protect stored data. But to install software and store other stuff hidden account is more secure way. So, in this article we are going to explain about how to create an account with admin privileges and manage it with step by step guidance using notepad code and access them via command prompt whenever we want.

How To Create Hidden Account On Windows With Admin Privileges.

  1. Open the Notepad. Just click start menu and type notepad in Windows 7 and hit enter.
2. After that copy the following command and paste them on the notepad.
Creating User Account
@echo off
net user honey 12345 /add
net localgroup Administrators honey /add
3. Save the above file on desktop with any name and with .bat extension. Remember .bat extension must be there to create the account.
4. You can also replace honey with your username and password 12345 with your password.
5. After saving your file you have to right click on it and choose run as administrator.
Bat File Run as Admin6. Just for few second a command prompt appear then disappear.
7. Now your user account with admin privileges is created.
8. After that open the cmd and type the net user command to see your created user account.
View User Accounts

Step To Hide Our Account On Windows.

  1. Click on the start menu and type the cmd and right click on it and select run as administrator.
Start Menu CMD as Admin
2. Now type the following command on the command prompt and hit enter.
net user honey /active:no
3. After running command you got a command completed message successfully.
CMD Hide User Account
4. Now your account is successfully hidden.

Steps To Show Hidden Account On Windows.

1. Click on the start menu and type the cmd.
2. Right click on cmd icon and select run as administrator.
3. Now type the following command on the command prompt and hit enter.
net user honey /active:yes
4. After running command you got a command completed message successfully.
CMD Activate User Account
5. Now your account with specified name is activated. You can log off to view your account.
Start Menu Log off Option
6. Do not forgot to change your user name in all the above commands with honey and password 12345 with your password.
In conclusion, This is a simple guide to how to create and Manage hidden account on Windows PC. We hope you like it. Share it with your friends as well.

How To Recover Deleted Files From Recycle Bin - 2017

How To Recover Deleted Files From Recycle Bin - 2017
How to recover deleted files from Recycle Bin
We use computers in every field. May it be professional or personal work, we always find use for computers in our life. Therefore, we are dependent on our computers to a high extent. Computers are highly efficient machines used in offices and corporate sector as well. Personal computers are used by people to send emails, create documents, listen to music and watch videos and much more. Hence, every computer has a lot of important files stored on it which are very important for the user. Any user’s worst nightmare is when they loose a file they wanted. People accidentally delete files and folders and regret it later. So its better to use backup software for PC. But People constantly look for ways to recover deleted files when they don’t have any backup. So if you want to recover deleted files from recycle bin, worry no more. We have perfect guide for you with complete solution for how to recover deleted files from recycle bin. Below we have mentioned everything that you need to know.

How To Recover Deleted Files From Recycle Bin.

What Is Recycle Bin ?

Recycle bin is a feature of Windows OS that is a lifesaver for all the users. It is a temporary storage where all the files deleted by the user are stored as they are not permanently erased from the system. In Windows, you can access it by a very simple method. There is a Dustin icon found on the desktop. Double clicking on this icon opens the recycle bin directory.

Steps To Recover Deleted Files From Recycle Bin.

Recovering Deleted files from recycle bin is a very easy process. Here are the steps to recover deleted files from recycle bin :
Step 1. Go to the desktop screen on your Window PC.
Step 2. Double click on the Bin icon to access the Recycle Bin directory.
recycle bin
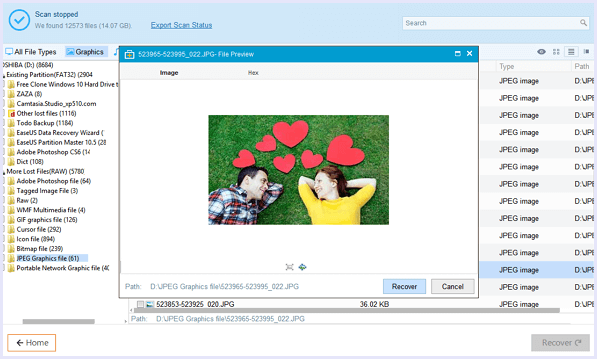
Step 3. From the list of deleted files find the file that you want to recover. You can also use the search and sort features like you would normally do in the Windows explorer to locate your file.
Step 4. After you have found your file, right click on it and click on “Restore”.
restore recyclebin
Now your file will be recovered from to recycle bin. You can now access it normally from its original location.

Recover Files Deleted From Recycle Bin.

The most critical problems arise when you want to recover a deleted file from recycle bin but you have either emptied the recycle bin or permanently deleted the file by accident. We do not have a built in way to recover such files but do not worry as there is a definite work around this problem and you can get your files back by following this simple procedure.
Here are the steps to recover permanently deleted files from recycle bin :
Step 1. Download, install and run the program on your computer from the link below.
Download buttoninstall recuva
Step 2. Check any one of the given options to specify the type of file you are trying to recover.
recuva file type
Step 3. Select the location where you want to retrieve the files from.
recuva storage selection
Step 4. In the next screen, click “Start” button. Don’t select deep scan option until you fail on your first attempt to recover the file as it is very time consuming.
Step 5. To retrieve the file, check the box next to file name in the scan results and click on “Recover” button.
In conclusion, we hope the above guide about how to recover deleted files from recycle bin on windows helps you in case you are in trouble and need any help, feel free to contact us.

How To Install Linux On VirtualBox In Windows 7, 8, 10

How To Install Linux On VirtualBox In Windows 7, 8, 10
How To Install Linux On VirtualBox
Linux is popular open source operating system that is available for free on the internet. Linux has many features like multitasking, multi-user, multi-threading, multi-processing, virtual memory support etc. Due to above Linux features, most people also prefer Linux in parallel to regular operating systems. Linux even has many flavors like “Kali Linux”“Ubuntu”“Backtrack”“Solaris” etc. Sometimes a user wants to use the functionality of two or more operating systems at the same time. But our computer can’t run two OS at the same time no doubt we can dual boot windows and Linux. But if you want to use two operating system in parallel then “Virtual Box” is the best option. A virtual box is software tool that allow you to install another operating system in parallel to your regular operating system and allows you to work on both operating systems at the same time.  If you do not know how to install Linux on virtualbox then do not worry because in this article we will explain the method to install Linux in virtual Box.

How To Install Linux On VirtualBox In Windows.

Follow the steps given below to install Linux on windows using Virtualbox machine and both operating system simultaneously.

Steps Install Linux On VirtualBox:

Step 1. Download VirtualBox from its official Website. Download the correct version for your operating system.
Download buttonStep 2. There are multiple choices for Linux versions. Choose the package that matches your Linux distribution, or use the “All distributions” option if your Linux distribution is not listed.
Step 3. Install the VirtualBox program. If you are using Windows, double-click the setup file and follow the prompts to install. For Mac open the DMG file that you downloaded and drag the VirtualBox file to your Applications folder.
install oracle vm virtualbox
Step 4. Double click to start the program. We can run VirtualBox directly from the installation program, or we can start it from the desktop icon. It is easy to make a desktop icon.
Step 5. After the installation of virtual box machine take place click the “New” button. This will open the wizard that will guide you through the process to create your first virtual machine.
Step 6. In the next wizard we have to choose a name for our virtual machine to uniquely identify it and also select the type of operating system to be installed.
linux os installation settings virtualbox
Step 7. Next step is to set the amount of RAM. VirtualBox will automatically choose the  minimum amount of RAM for the operating system we selected. It is not recommended that you set the max amount of RAM.
select memory size for virtual machine
Step 8. Then, next step is to create a virtual hard drive. Virtual Box will automatically set a recommended size based on the operating system, but you can set it to whatever you like.
create virtual hard drive for vm
Step 9. Check the specifications for your operating system to see how much space you should allocate at minimum. Then, click on the “create” button. Now your virtual machine is created.
Note:- Remember that any programs you install will also take up space on your virtual hard drive, so plan accordingly. The most common format for virtual hard drives is “VDI (VirtualBox Disk Image)”.
Step 10. Click on start Button to launch your virtual machine. Every Time you have to select your machine before launching when you start the application.
virtual machine created linux virtualbox
Step 11. Start the operating system installation. Once the virtual machine has been configured, the wizard will then close and you will be taken back to the Virtual Box main window.
Step 12. Double-click your new machine in the left menu to start it up for the first time. A new wizard will then appear to help start the operating system installation.
Step 13. If you are installing from a disc, then insert it into your computer and select “Host drive” and the right drive letter from the drop-down menu.
run ubuntu in virtual machine
Step 14. If you are installing from an image file, then click the folder icon to browse through your computer for the installation image file. You can also use bootable pendrive and install it via boot options.
Step 15. Install the operating system after selecting the installation media, the operating system installation will begin.
Step 16. Then, after the installation  our virtual machine is ready to run. Simply double-click the machine in the left menu of the Virtual Box main page to start the virtual machine. The virtualbox will boot and load the Linux operating system.
lunix running on windows virtual machine
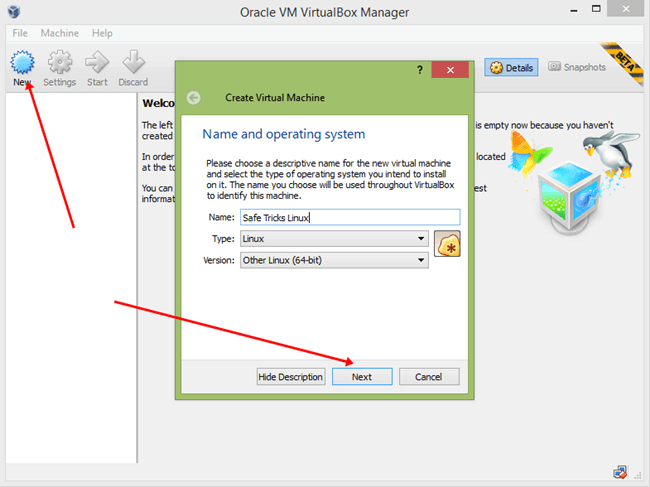
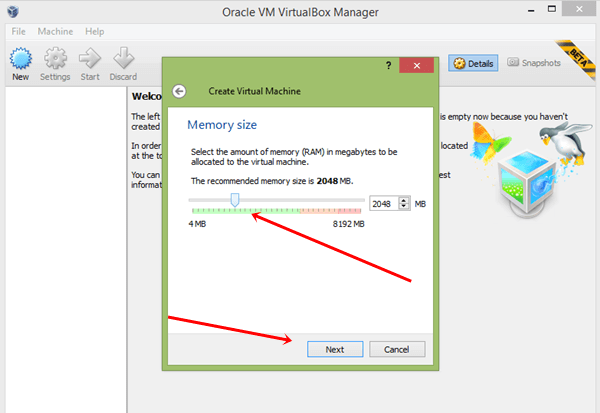
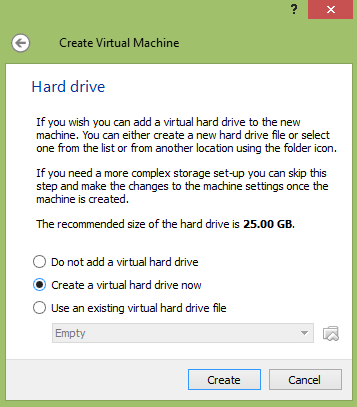
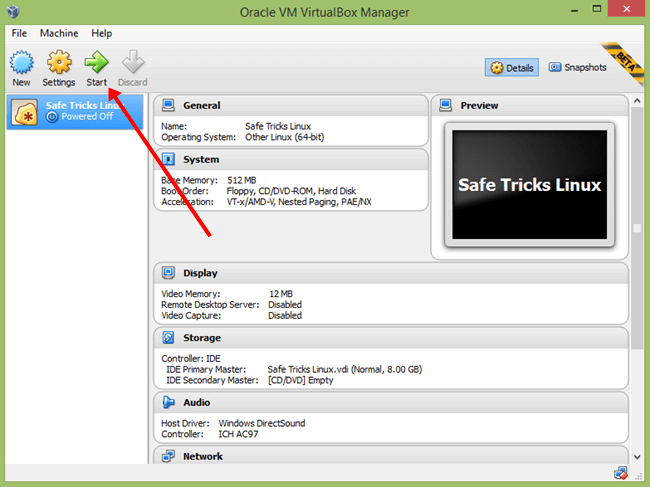
Now you can use Linux on your Windows PC as well as Mac along with another OS.
In conclusion, We hope you find the above guide on How to install Linux on VirtualBox Machine helpful. For any help or suggestion, feel free to write to us in comments below. Share the article with your friends as well.

How To Disable Charms Bar On Windows 8.1

How To Disable Charms Bar On Windows 8.1
How To Disable Charms Bar On Windows 8 Or 8.1
Today, Personal computers have found their way into all aspects of life. No matter if you are a student or a professional in any field, a computer is a must need everywhere. A very important component of a personal computer is its software. And ever since the boom in use of personal computers, Windows has been a primary Operating System all over the world. Windows is a GUI based Desktop operating system that runs on almost all computers of the world. Windows OS has evolved a lot from its earlier versions and now many people run Windows 8. The Windows 8 is a quite recent windows version if not the latest. It ditched the signature start menu in favor of a start tile screen. Windows 8 also brought many UI changes. Most users didn’t welcome these changes as one of the most hated feature of Windows 8 is the charms bar. Charms Bar appears on the right side of the screen when the mouse is dragged from there or the pointer hits the top right corner. It is annoying as most users accidentally turn it up and there is no way to turn it off using Windows settings. Hence, If you are a Windows 8 users, and are looking for a way to disable Charms bar on windows 8, or stop it from accidentally showing up again and again, we have a solution for you.

How To Remove Charms Bar On Windows 8.

Given below is the best way to get rid of he annoying Charms Bar in Windows 8. Follow the steps to remove Charms Bar from the right side of your screen.
remove charms bar windows 8

Steps To Disable Charms Bar On Windows 8:

Step 1. Download and install Classic Shell from the link below.
Download Now ButtonStep 2. Then, after installation Right click on the newly installed start button and select settings option.
Step 3. Click All Settings button and then go to “Windows 8 Settings” Tab.
Step 4. In this tab, tick the “All” option under “Disable active corners”
remove charms bar shell setings windows 8
Step 5. Click “OK” to apply these changes and you are done.
Hence, now you have successfully disabled the annoying Charms Bar in Windows 8.
Note : If you are still seeing the Charms bar Randomly popping up on the right side of your screen , try to turn off “Enable Edge Swipe” in “Control Panel > Mouse”.
In conclusion, this is the simplest and easiest guide on how to disable Charms Bar on Windows 8. For any help or assistance, feel free to contact us or write to us in comments below. Also, share with us your experience with Windows 8.

How To Change Proxy Settings On Chrome & Firefox Browser

How To Change Proxy Settings On Chrome & Firefox Browser
How To Change Proxy Settings In Chrome & Firefox Browser
Proxy and IP address are specific address based on different computer, location and internet connection. Proxies are helpful in many different situations sometimes we are not able or don’t have permission to access any specific website or other featured parts which are restricted in some areas or on specific device. Then by adding your own proxy you can easily access or complete any task you want to do. So for this purpose, this article is only for those who have never played with their browser settings. If don’t have knowledge about how to change proxy settings in browser then this tutorial with helps to learn about how to add IP address into browser and change your current internet surfing location.

How To Change Proxy Settings In Chrome & Firefox.

Proxy Settings For Mozilla Firefox.

  • Open Your Mozilla Firefox >> Tools >> Options.
  • Now Window will appear choose Advanced Tab at last.
  • In Advanced Tab click on Network and click on Settings button of connection appear at first.
firefox network settings
  • Then new window appear choose Manual proxy features and then your proxy in the place of HTTP box and also add Port no in the given box.
  • Just under the box of Proxy their is dialogue about Use this proxy for all protocols. Must check that box also if needed.
add proxy manually in firefox
  • Then save down your settings now your proxies are working fine.

Proxy Settings For Google Chrome and Other Browsers.

If you add proxy through Google chrome settings then it works not only for Google chrome also for all other browsers means proxy added through chrome work for whole internet connection.
  • Open Your Google Chrome Browser
  • From top right corner click on settings button >> Then Settings from list.
  • New window will appear scroll down your mouse and click on Show Advanced settings.
chrome change proxy settings
  • Then Find change proxy settings appears in Network section.
  • Then new window will appear of Internet Properties click on Connections tab.
  • In connection tab there are settings option for Dial up connection and for LAN connection.
  • If your connection is Dial up then select it from the dial box and its settings button is just in right side or box.
  • But if your connection LAN connection then click on LAN settings.
Internet property settings
  • Tick the box use this proxy for LAN/Dial up connection under Proxy servers section.
  • Then Add your Proxy and port addresses.
  • After adding check the box of Bypass the proxy server for local settings option.
LAN add proxy settings
  • Now save down your all settings and proxies will start working.
These above settings are for Mozilla and Google Chrome but settings in chrome work for whole internet means no need to add manually in other browsers also.
Note:- In condition if you are not using Mozilla or chrome then for Manually addition proxy into device option your control panel and then find internet option same will appear as for chrome settings.
We hope you learn how to add proxy address into browser if you don’t know yet before then this topic help to learn something new. For any question, write to us in comments below.

How To Recover Deleted Files From SD Card

How To Recover Deleted Files From SD Card
We use a lot of gadgets today. We depend on smartphones, tablets, digital cameras, DSLRs, MP3 players and many more for our tasks daily. All these devices offer many features and also have large storage options. This storage is possible due to SD cards. Almost all gadgets we use today use SD cards as their storage mediums. Hence our important data such as images, music, movies, videos and a lot more is stored in our tiny SD cards. Any users worst nightmare is when valuable data gets deleted from their SD cards. Users accidentally delete their important data from SD cards without backup or sometimes, format SD cards. If something like this has happened with you too, then do not worry. Here we have a complete guide to recover deleted files from SD card. We can recover almost all data deleted from SD card. We have explained step by step guide data recovery from memory cards.

How To Recover Deleted Files From SD Card.

Below is the step by step guide on how to recover deleted data from SD cards. Follow the steps carefully to restore deleted images, music, videos, documents and much more from your SD card.
Note:- We have used here EaseUS data recovery tool. There are a number of tools available that work the same and you can try them as well. Steps are also similar with minor feature changes.
Step 1. Download and install EaseUS data recovery tool from the link below.
Download buttonThe free version offers upto 2GB of data recovery and if you have more data kindly purchase the pro version.
Step 2. Connect your SD card to the computer.
Step 3. Launch the EaseUS data recovery tool and open the Data Recovery wizard.
Step 4. Select the types of files that you are looking for on your SD card.
easeus recover sd card data select files
Step 5. Click on the scan button and select the storage of your SD card.
easus data recovery sd card
Step 6. After the scan is complete, you will be shown a complete list of deleted files found on your SD card.
Step 7. After finding the file you were looking for, click on the “recover” button to save it. Use local storage of the computer to save the recovered files instead of saving them in the SD card.
easeus data recovery scanned files
And this is how you can recover all your deleted files.
In conclusion, this is the best way to recover deleted files from SD card. In case you have any trouble or need any help, feel free to contact us and also wrote your suggestions in comments below.

200+ CMD Commands List (Command Prompt Codes)

200+ CMD Commands List (Command Prompt Codes)
CMD Commands List (Command Prompt Codes)
CMD or “Command Prompt” is a command line interpreter built right into the Windows operating system. All you need to do is search for CMD and you are sure to find it. If you have ever done something geeky with your windows PC, you are sure to have used it. It can be used to perform tasks and modify system settings that are usually not available in GUI. But the main issue with CMD is that there are keywords and commands that a user must learn as there are no menus and icons to use. Most of us don’t remember these commands as there are more than 200 of them. Hence, users are continuously looking for CMD commands on the internet. Here in this article, we have a complete list of all the CMD commands there are. So you do not have to look for CMD commands anymore. All you need to do is search right CMD command and perform it command prompt list given below.

All Best CMD Commands List.

Given below is the complete list of all command prompt commands :

 In conclusion, these are the best CMD commands list that you can find. If you think we have  missed any command, please tell us in the comments below. Also share with us your  suggestions and experiences.

Gadget