Proxy and IP address are specific address based on different computer, location and internet connection. Proxies are helpful in many different situations sometimes we are not able or don’t have permission to access any specific website or other featured parts which are restricted in some areas or on specific device. Then by adding your own proxy you can easily access or complete any task you want to do. So for this purpose, this article is only for those who have never played with their browser settings. If don’t have knowledge about how to change proxy settings in browser then this tutorial with helps to learn about how to add IP address into browser and change your current internet surfing location.
How To Change Proxy Settings In Chrome & Firefox.
Proxy Settings For Mozilla Firefox.
- Open Your Mozilla Firefox >> Tools >> Options.
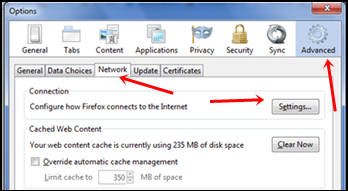
- Now Window will appear choose Advanced Tab at last.
- In Advanced Tab click on Network and click on Settings button of connection appear at first.
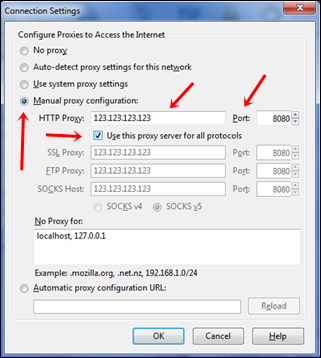
- Then new window appear choose Manual proxy features and then your proxy in the place of HTTP box and also add Port no in the given box.
- Just under the box of Proxy their is dialogue about Use this proxy for all protocols. Must check that box also if needed.
- Then save down your settings now your proxies are working fine.
Proxy Settings For Google Chrome and Other Browsers.
If you add proxy through Google chrome settings then it works not only for Google chrome also for all other browsers means proxy added through chrome work for whole internet connection.
- Open Your Google Chrome Browser
- From top right corner click on settings button >> Then Settings from list.
- New window will appear scroll down your mouse and click on Show Advanced settings.
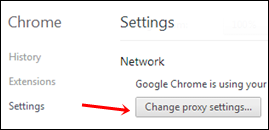
- Then Find change proxy settings appears in Network section.
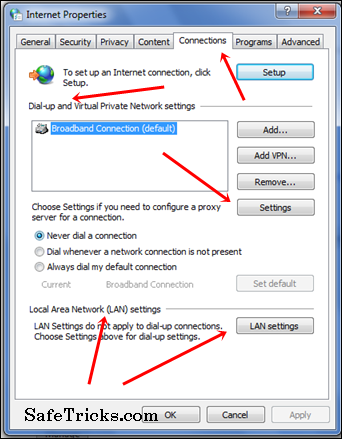
- Then new window will appear of Internet Properties click on Connections tab.
- In connection tab there are settings option for Dial up connection and for LAN connection.
- If your connection is Dial up then select it from the dial box and its settings button is just in right side or box.
- But if your connection LAN connection then click on LAN settings.
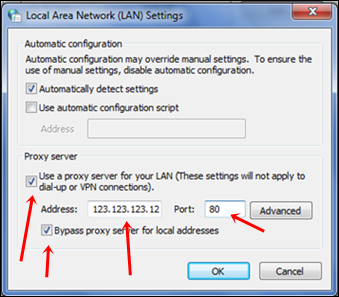
- Tick the box use this proxy for LAN/Dial up connection under Proxy servers section.
- Then Add your Proxy and port addresses.
- After adding check the box of Bypass the proxy server for local settings option.
- Now save down your all settings and proxies will start working.
These above settings are for Mozilla and Google Chrome but settings in chrome work for whole internet means no need to add manually in other browsers also.
Note:- In condition if you are not using Mozilla or chrome then for Manually addition proxy into device option your control panel and then find internet option same will appear as for chrome settings.
We hope you learn how to add proxy address into browser if you don’t know yet before then this topic help to learn something new. For any question, write to us in comments below.

0 Komentar