Showing posts with label Blogger Tricks. Show all posts

Top 5 Best Popular Posts Widgets for Blogger

If you're using Blogger as the platform for your personal or business blog, you're probably looking for ways to customize it and make it your own. This way, you'll make your webpages unique and eye-catching and ensure they'll stand out from the many other pages on the internet. You'll also grab the attention of your target market, encourage them to browse through your blog and become your loyal readers and followers.

Fortunately, there are lots of ways to personalize your Blogger blog, and one of these is to customize your Popular Posts widget. Haven't installed this yet? Don't worry since putting it in your blog easy.

Adding the Popular Posts Widget for Blogger

Just click on your blog title, access the Layout menu, click "Add Widget" and choose "Popular Posts". A window will appear asking you to configure the widget by choosing which posts you'll feature (e.g. those that were most viewed in the past 7 days or 30 days or from the beginning of your blog). You'll also be asked to choose how many posts you'll feature in your Popular Posts section and select if you'll show the post title only or along with the image thumbnail and/or the snippet. (Remember that each widget style has different requirements, so follow the instructions carefully to know if you'll need the snippet and image thumbnail or not).

Configuring Popular Posts Widget for Blogger

Once you've followed these instructions, you'll get to see the basic version of the Popular Posts Widget for Blogger in your blog. You can stick with this if it matches your blog design but, if it sticks out like a sore thumb or doesn't suit your taste, there's no need to fret since you can personalize it. You can choose from the following styles - see the demo blog

Popular Posts Style 1 - Box within a box

This is an interesting widget style since it uses your snippet and image thumbnail in a unique way. Your snippet is written in opaque text and placed in a small transparent box. This, in turn, is placed in a bigger rectangular box, wherein your image thumbnail is used as a background. Choosing this Popular Posts Widget for Blogger can be a great option if you want to brighten up your blog and grab the attention of readers with your colorful photos.

popular posts widget for blogger

CSS code:
<style type='text/css'>
.sidebar .PopularPosts ul {
margin: 0;
padding: 0;
}
.sidebar .PopularPosts ul li {
list-style: none !important;
padding: 0 !important;
margin-bottom: 10px;
}
.sidebar .PopularPosts .item-thumbnail {
height: 190px;
margin: 0;
overflow: hidden;
width: 100%;
}
.sidebar .PopularPosts .item-title {
position: relative;
}
.sidebar .PopularPosts img {
height: 100%;
width: 100%;
object-fit: cover;
}
.sidebar .PopularPosts .item-title a {
color: #FFFFFF;
font: 15px &#39;Oswald&#39;, sans-serif;
text-transform: uppercase;
font-size: 20px;
padding: 10px;
position: absolute;
right: 0;
left: 0px;
margin: 0px auto;
text-align: center;
text-decoration: none;
top: 40px;
width: 60%;
height: 26px;
overflow: hidden;
z-index: 2;
}
.sidebar .PopularPosts .item-snippet {
background: rgba(0, 0, 0, 0.35);
border-top: 6px solid rgba(0, 0, 0, 0.1);
border-bottom: 6px solid rgba(0, 0, 0, 0.1);
color: #FFFFFF;
left: 0px;
right: 0px;
margin: 0px auto;
padding: 65px 10px 10px;
position: absolute;
font: 13px &quot;Times New Roman&quot;,Times,FreeSerif,serif;
text-align: center;
top: 35px;
width: 60%;
z-index: 1;
}
.sidebar .PopularPosts .item-content {
position: relative;
}
</style>

Popular Posts Style 2 - Large thumbnails with small post titles underneath

This uses the same code as the basic Blogger Popular Posts Widget with a few tweaks. Popularized by well-known blogs, this style is eye-catching because it focuses on pictures, which don't only summarize the posts' content but also add visual drama to the entire page. This is particularly useful for blogs that focus on clothes, makeup, art and other topics that highly depend on visual presentation to better express ideas.
popular posts widget for blogger
CSS code:
<style type='text/css'>
.sidebar .PopularPosts ul {
counter-reset: popularcount;
margin: 0;
padding: 0;
}
.sidebar .PopularPosts ul li {
width: 100%;
list-style: none !important;
padding: 0 !important;
margin-bottom: 20px;
position: relative;
border: 0;
}
.sidebar .PopularPosts .item-thumbnail a {
clip: auto;
display: block;
height: auto;
height: 120px;
}
.sidebar .PopularPosts .item-thumbnail {
width: 100%;
position: relative;
margin-bottom: 15px;
}
.sidebar .PopularPosts .item-thumbnail::before {
background: rgba(0, 0, 0, 0) none repeat scroll 0 0;
border-bottom: 29px solid #fff;
border-left: 29px solid transparent;
border-right: 29px solid transparent;
bottom: 0px;
content: &quot;&quot;;
height: 0;
width: 0px;
left: 0px;
right: 0px;
margin-left: auto;
margin-right: auto;
position: absolute;
z-index: 3;
}
.sidebar .PopularPosts .item-thumbnail:after {
color: #000;
content: counter(popularcount, decimal);
counter-increment: popularcount;
font: 13px &quot;Times New Roman&quot;,Times,FreeSerif,serif;
list-style-type: none;
position: absolute;
bottom: 0;
text-align: center;
margin: 0px auto;
left: 0px;
right: 0px;
z-index: 4;
}
.sidebar .PopularPosts .item-thumbnail img {
position: relative;
width: 100%;
height: 120px;
object-fit: cover;
}
.sidebar .PopularPosts .item-title {
font: 15px &#39;Oswald&#39;, sans-serif;
text-transform: uppercase;
text-align: center;
margin: 0px auto;
padding-bottom: 10px;
border-bottom: 1px solid #000;
}
.sidebar .PopularPosts .item-title a {
color: #000;
text-decoration: none;
}
.sidebar .PopularPosts .item-snippet {
padding: 10px 15px;
font: 13px &quot;Times New Roman&quot;,Times,FreeSerif,serif;
text-align: center;
}
</style>

Popular Posts Style 3 - Colorful boxes

If your blog needs a pop of color, this is the right choice for you. This widget style presents your Popular Posts in several boxes that feature a thumbnail image and have bright, eye-catching shades like light green, ocher yellow and vivid orange. Each box has a different color, and you can add up to four boxes.

popular posts widget for blogger

CSS code:
<style type='text/css'>
.sidebar .PopularPosts ul {
padding: 0;
margin: 0;
}
.sidebar .PopularPosts .item-thumbnail a {
clip: auto;
display: block;
height: auto;
overflow: hidden;
}
.sidebar .PopularPosts .item-thumbnail {
width: 130px;
height: 130px;
border-right: 5px solid #fff;
margin: 0px 10px 0px 0px !important;
position: relative;
}
.sidebar .PopularPosts .item-thumbnail img {
position: relative;
height: 100%;
width: 100%;
object-fit: cover;
}
.sidebar .PopularPosts ul li {
float: left;
margin-bottom: 5px;
max-height: 130px;
min-width: 250px;
overflow: hidden;
}
.sidebar .PopularPosts ul li:first-child {
background: #D9EDF7;
}
.sidebar .PopularPosts ul li:first-child + li{
background: #F2DEDE;
}
.sidebar .PopularPosts ul li:first-child + li + li {
background: #DFF0D8;
}
.sidebar .PopularPosts ul li:first-child + li + li + li {
background: #FFEEBC;
}
.sidebar .PopularPosts ul li:first-child + li + li + li + li{
background: #E0E0E0;
}
.sidebar .PopularPosts .item-title {
font: 13px &#39;Oswald&#39;, sans-serif;
text-transform: uppercase;
padding: 10px 5px 10px;
}
.sidebar .PopularPosts .item-title a {
color: #000;
text-decoration: none;
}
.sidebar .PopularPosts .item-snippet {
font: 13px &quot;Times New Roman&quot;,Times,FreeSerif,serif;
padding-right: 5px;
}
.sidebar .PopularPosts .widget-content ul li {
padding: 0px 5px 0px 0px!important;
}
</style>

Popular Posts Style 4 - Grid layout

Just like the large-picture widget style, the grid layout is an excellent option if you want to showcase your pictures or if your blog depends on visual information. However, the title of your posts won't be included in the layout, so readers will have to hover their mouses on the images to read the titles.

popular posts widget for blogger

CSS code: 
<style type='text/css'>
.sidebar .PopularPosts ul {
padding: 0;
}
.sidebar .PopularPosts ul li:first-child{
width: 100%;
max-height: 100%;
opacity: 0.9;
}
.sidebar .PopularPosts ul li:nth-child(even){
margin-right: 2%;
}
.sidebar .PopularPosts ul li {
box-sizing: border-box;
position: relative;
padding: 0px !important;
width: 49%;
max-height: 120px;
opacity: 0.4;
overflow:hidden;
float: left;
margin-bottom: 2%;
-webkit-transition: all 0.5s ease 0s;
-moz-transition: all 0.5s ease 0s;
-ms-transition: all 0.5s ease 0s;
-o-transition: all 0.5s ease 0s;
transition: all 0.5s ease 0s;
}
.sidebar .PopularPosts ul li:hover {
opacity: 1;
}
.sidebar .PopularPosts .item-thumbnail {
margin: 0;
width: 100%;
}
.sidebar .PopularPosts ul li img {
box-sizing: border-box;
width: 100%;
height: 100%;
object-fit: cover;
padding:0;
}
.sidebar .PopularPosts .item-content:hover .item-title a,
.sidebar .PopularPosts .item-thumbnail-only:hover .item-title a {
visibility: visible;
opacity: 1;
}
.sidebar .PopularPosts .item-title a {
color: #fff;
background: rgba(0, 0, 0, 0) linear-gradient(to bottom, rgba(0, 0, 0, 0) 0%, rgba(0, 0, 0, 0.93) 100%, rgba(0, 0, 0, 0.85) 100%);
text-decoration: none;
position: absolute;
text-align: center;
font: 13px &#39;Oswald&#39;, sans-serif;
left: 0;
right: 0;
bottom: 0%;
padding: 100px 10px 10px;
opacity: 0;
visibility: hidden;
}
.sidebar .PopularPosts .item-snippet {
display: none;
}
</style>

Popular Posts Style 5 - Numbered posts

If you love numbered lists, or if you'd like to make your blog more organized, this can be the perfect option. By using the code for this widget style, your Popular Posts will be automatically numbered and will feature clean, minimalistic boxes that include your snippet and image thumbnail.

popular posts widget for blogger

CSS code:
<style type='text/css'>
.sidebar .PopularPosts ul {
counter-reset: popularcount;
margin: 0;
padding: 0;
}
.sidebar .PopularPosts ul li {
float: left;
max-height: 130px;
min-width: 250px;
position: relative;
}
.sidebar .PopularPosts .item-thumbnail::after {
color: rgba(255,255,255, 0.63);
content: counter(popularcount, decimal);
counter-increment: popularcount;
font: 70px &#39;Oswald&#39;, sans-serif;
list-style-type: none;
position: absolute;
left: 5px;
top: -5px;
z-index: 4;
}
.sidebar .PopularPosts .item-thumbnail::before {
background: rgba(0, 0, 0, 0.3);
bottom: 0px;
content: &quot;&quot;;
height: 100px;
width: 100px;
left: 0px;
right: 0px;
margin: 0px auto;
position: absolute;
z-index: 3;
}
.sidebar .PopularPosts .item-thumbnail a {
clip: auto;
display: block;
height: auto;
overflow: hidden;
}
.sidebar .PopularPosts .item-thumbnail {
width: 100px;
height: 100px;
margin: 0px 10px 0px 0px !important;
position: relative;
}
.sidebar .PopularPosts .item-thumbnail:hover:before {
display: none;
}
.sidebar .PopularPosts .item-thumbnail img {
position: relative;
padding-right: 0px !important;
height: 100%;
width: 100%;
object-fit: cover;
}
.sidebar .PopularPosts .item-title {
font: 13px &#39;Oswald&#39;, sans-serif;
text-transform: uppercase;
padding: 0px 5px 10px;
}
.sidebar .PopularPosts .item-title a {
color: #000;
text-decoration: none;
}
.sidebar .PopularPosts .item-snippet {
font: 13px &quot;Times New Roman&quot;,Times,FreeSerif,serif;
}
.sidebar .PopularPosts .widget-content ul li {
padding: 0px 5px 0px 0px !important;
}
.sidebar .PopularPosts .item-content {
padding: 5px 0px;
border-bottom: 1px dotted #dedede;
overflow: hidden;
height: 100px;
position: relative;
}
</style>
These are just some of the widget styles you can choose from. When you've picked a style you want, make sure to copy its CSS code. Once you do so, go to your blog, click "Template" on the left side and select "Edit HTML" under the template preview.

These next codes need to be pasted above the "</head>" or "</body>" tags, so check the instruction to know exactly where you need to put the code.

Adding the CSS

When the template editor has opened, click anywhere inside the code area and hit CTRL + F or Command F to search the following tag:
</head>
Just ABOVE the </head> tag, copy-paste the CSS code of one of the styles above.


Important: If the Popular Posts widget is located in the footer of your blog, remove the .sidebar class found in the CSS code in order to make it work.

Please note that most of the styles are using the Oswald font which you need to add to your template's code as well.

So, search for this tag:
<head>
Just BELOW it, add this line:
<link href='https://fonts.googleapis.com/css?family=Oswald:400,700' rel='stylesheet' type='text/css'/>

Adding the JavaScript

These styles also require JavaScript codes in order to resize the popular posts image / thumbnail and trim the post snippet and title. To add the JavaScript, search the </body> tag and paste the following script just above it:
<script src='//ajax.googleapis.com/ajax/libs/jquery/1.11.1/jquery.min.js'/>
<script type='text/javascript'>
$(&#39;.popular-posts img&#39;).attr(&#39;src&#39;, function(e, t) {
return t.replace(&#39;/w72-h72-p-nu/&#39;, &#39;/s350-c/&#39;)
});
$(&#39;.popular-posts ul li .item-snippet&#39;).each(function(){
var txt=$(this).text().substr(0,60);
var j=txt.lastIndexOf(&#39; &#39;);
if(j&gt;10)
$(this).text(txt.substr(0,j).replace(/[?,!\.-:;]*$/,&#39;...&#39;));
});
$(&#39;.popular-posts ul li .item-content a&#39;).each(function(){
var txt=$(this).text().substr(0,60);
var j=txt.lastIndexOf(&#39; &#39;);
if(j&gt;=6)
$(this).text(txt.substr(0,j).replace(/[?,!\.-:;]*$/,&#39;...&#39;));
});
</script>
Note: if you have already the jQuery library in your template, remove the line in red.

Once you have added all the codes in the right place, press the "Save template" button to save the changes.

That's it!

The five Popular Posts widgets for Blogger featured today are all great solutions for adding a popular post section to your blog. They all have different appearance for determining what makes a post popular, but the end result is the same: visitors are always one click away from your best content. Try some of these styles, find your favorite, and see how it impacts the performance of your blog.

Add Automatic Featured Posts Slider Widget in Blogger

Anyone with a blog wants readers to stay rather than move on to another. It's not being selfish but after someone has read one post, you'd definitely want them to read another, right? After all, isn't it one of the tenets of SEO to make people stay longer on your blog if it has to have a fighting chance at the rankings game?

The question now is: how exactly do you entice them to read a few more of your blog posts?

First off, you don't know exactly what brought a reader to your site. Well, you sort of do, if you have Google Analytics and all that. But that's beside the point. It wouldn't be productive for you to stare at GA the entire day hoping that it will tell you that yes, someone has been perusing your blog.

The point being driven at here is that you have to offer more on your blog. It's not enough that you get traffic from search engines and other sites; you also have to add some extras that will entice visitors to stay longer.

How exactly do you do that?

The Tactics of Persuading Users to Stay

Bloggers have employed a variety of tactics to persuade readers to stay. For one, they load the sidebar with widgets for Popular Posts, for example. Of course, it would be in the interest of your readers to know which other posts on your blog are gaining traction. Maybe those pieces are of interest to them as well. As a result, you've got one surefire way of making readers stay.

Now, what if you want to highlight Featured Posts, for example? Let's say that your blog has been around for a number of years and in that span, it has produced some great content that received quite the number of shares, likes, +1s, comments on so on. Wouldn't that be the kind of post you want featured? Unless your reader was looking for that topic specifically, there's little chance that they might uncover that gem if you don't bring it to their attention.

Thankfully, it's quite possible to add a Featured Posts slider for Blogger. And if you don't know how to make one yourself, this is exactly what this post is for. Here's an awesome Featured Posts slider widget that you can use on your blog.


How to Add Featured Posts Slider Widget in Blogger

1. Go to 'Layout' > click the 'Add a gadget' link in the sidebar area and select 'HTML/JavaScript' gadget from the pop-up window.

2. Add the code below inside the empty box:
<style type="text/css">
ul.featured-widget-list,ul.featured-widget-list li{margin:0;padding:0;list-style:none;position:relative }ul.featured-widget-list li{display:none}ul.featured-widget-list li:nth-child(1){display:block;line-height:0}ul.featured-widget-list img{border:0;width:100%;height:auto}ul.featured-widget-list .featuredbg{width:100%;height:100%;position:absolute;z-index:2;left:0;top:0;opacity:.6;background-image:url(https://blogger.googleusercontent.com/img/b/R29vZ2xl/AVvXsEiI8Wib_qNtll_rLv0oY2CWHW273DN0pZbu0QF0KhaZwYDFSqo4u4glejcpVPJ3aEKDoMU_Aqi0Y9yMLbCiS91H3xxN3yjzWLPU4E9zxVC3kEllMOVE6RKH4G93BITclYF5F9j6IyK7yRM/s400/overlay-bg.png);background-position:0% 100%;background-repeat:repeat-x}ul.featured-widget-list .featuredbg:hover{opacity:.1}ul.featured-widget-list h5{position:absolute;left:0;right:0;text-align:center;bottom:10px;z-index:2;color:#fff;margin:0;text-transform: capitalize;padding:10px 20px;line-height:1.9em;letter-spacing:0.3px;font: 600 16px 'Abel', sans-serif;overflow:hidden}ul.featured-widget-list li:hover h5{bottom:30px}ul.featured-widget-list .featured-meta{font: 11px 'Abel', sans-serif;letter-spacing:0.3px;position:absolute;bottom:0;left:0;right:0;text-align:center;z-index:2;color:#fff;opacity:0}ul.featured-widget-list h5, ul.featured-widget-list .featured-meta {-webkit-transition: all 0.3s;-moz-transition: all 0.3s;-o-transition: all 0.3s;transition: all 0.3s;}ul.featured-widget-list li:hover .featured-meta{bottom:20px;opacity:1}.feat-buttons{position:absolute;top:50%;left:0;z-index:5;width:100%}
.feat-buttons a{text-indent:-9999px;margin:0 7px;width:15px;height:15px;padding:5px;background:#000;-ms-filter:"progid:DXImageTransform.Microsoft.Alpha(Opacity=60)";filter: alpha(opacity=60);-moz-opacity:0.6;-khtml-opacity:0.6;opacity:0.6;position:relative;-webkit-border-radius: 50%;-moz-border-radius: 50%;border-radius: 50%;}.feat-prev{float:left;}.feat-next{float:right;}.feat-buttons a.feat-prev::before, .feat-buttons a.feat-next::before{content:"";width:0;height:0;border-width:6px 7px;border-style:solid;border-color:transparent #fff transparent transparent;position:absolute;top:50%;margin-top:-6px;margin-left:-11px;left:50%}
.feat-buttons a.feat-next::before{border-color:transparent transparent transparent #fff;margin-left:-3px}
</style>
<div id="featuredbwidget"></div>
<link href='https://fonts.googleapis.com/css?family=Abel' rel='stylesheet' type='text/css'/>
<script src="http://ajax.googleapis.com/ajax/libs/jquery/1.8.0/jquery.min.js" type="text/javascript"></script>
<script type='text/javascript'>
//<![CDATA[
featuredbwidget({
listURL:"http://www.techeria.in/",
featuredNum:9,
listbyLabel:false,
feathumbSize:350,
interval:3000,
autoplay:true,
featuredID:"#featuredbwidget"
});
function featuredbwidget(a){(function(e){var h={listURL:"",featuredNum:3,featuredID:"",feathumbSize:300,interval:5000,autoplay:false,loadingFeatured:"nextfeatured",pBlank:"https://blogger.googleusercontent.com/img/b/R29vZ2xl/AVvXsEhjVLzdJUYUY3lSoRq1JliW8prnJKMhgNH6wYmCp9T01oPJe2WJimllHd2C124mH8btbqmM9WbZ3b-5kRTNufSk2cFcQHQLmSL74NSHXjz_HS25k9O4SPxV0YGLkjDx9FUawx-ay8ExzUY/s500/no-image.png",byMonth:["Jan","Feb","Mar","Apr","May","Jun","Jul","Aug","Sep","Oct","Nov","Dec"],listbyLabel:false};h=e.extend({},h,a);var g=e(h.featuredID);var d=h.featuredNum*200;g.html('<div class="featslider"><ul class="featured-widget-list"></ul><div class="feat-buttons"><a href="#" class="feat-prev">Prev</a><a href="#" class="feat-next">Next</a></div></div>');var f=function(w){var q,k,m,u,x,p,t,v,r,l="",s=w.feed.entry;for(var o=0;o<s.length;o++){for(var n=0;n<s[o].link.length;n++){if(s[o].link[n].rel=="alternate"){q=s[o].link[n].href;break}}if("media$thumbnail" in s[o]){u=s[o].media$thumbnail.url.replace(/\/s[0-9]+\-c/g,"/s"+h.feathumbSize+"-c")}else{u=h.pBlank.replace(/\/s[0-9]+(\-c|\/)/,"/s"+h.feathumbSize+"$1")}k=s[o].title.$t;r=s[o].published.$t.substring(0,10);m=s[o].author[0].name.$t;x=r.substring(0,4);p=r.substring(5,7);t=r.substring(8,10);v=h.byMonth[parseInt(p,10)-1];l+='<li><a href="'+q+'"><div class="featuredbg"></div><img class="featuredthumb" src="'+u+'"/><h5>'+k+'</h5></a><div class="featured-meta"><span class="fdate"><span class="fday">'+t+'</span> <span class="fmonth">'+v+'</span> <span class="fyear">'+x+'</span></span> - <span class="fauthor">'+m+"</span></div></li>"}e("ul",g).append(l).addClass(h.loadingFeatured)};var c=function(){e(h.featuredID+" .feat-next").click()};var b=function(){e.get((h.listURL===""?window.location.protocol+"//"+window.location.host:h.listURL)+"/feeds/posts/summary"+(h.listbyLabel===false?"":"/-/"+h.listbyLabel)+"?max-results="+h.featuredNum+"&orderby=published&alt=json-in-script",f,"jsonp");setTimeout(function(){e(h.featuredID+" .feat-prev").click(function(){e(h.featuredID+" .featslider li:first").before(e(h.featuredID+" .featslider li:last"));return false});e(h.featuredID+" .feat-next").click(function(){e(h.featuredID+" .featslider li:last").after(e(h.featuredID+" .featslider li:first"));return false});if(h.autoplay){var i=h.interval;var j=setInterval(c,i);e(h.featuredID+" .featslider li:first").before(e(h.featuredID+" .featslider li:last"));e(h.featuredID+" .featslider").hover(function(){clearInterval(j)},function(){j=setInterval(c,i)})}e("ul",g).removeClass(h.loadingFeatured)},d)};e(document).ready(b)})(jQuery)};
//]]>
</script>

Automatic Featured Posts Slider Settings

  • listURL - replace "http://www.techeria.in/" with your blog URL
  • featuredNum - add the number of posts to display in the slider
  • listbyLabel - if you want to display posts by category / label, such as the tag fashion, it will be written as listbyLabel: "fashion"
  • feathumbSize - the size or dimension of the image in pixels
  • interval - time taken to change the slides position in milliseconds
  • autoplay - replace true with false if you don't want the slides to change automatically.
3. Once you are done with the settings, click the 'Save' button.

Now, this code is for a slider widget which means that instead of just a random list of Featured Posts, you get to display them with images (if they have one) and you can include effects too. You can also control how many slides should be shown because it just wouldn't be prudent to feature your entire oeuvre, right?

Plus, being a slider widget, it adds a nice little visual to your site. And we all know how visuals are important in enticing people to stay, don't we?

Top 5 Custom Blogger Contact Form Widgets

In the past, adding a custom contact form for Blogger was quite a complex process, and many bloggers were forced to use third party websites. However, even after Blogger launched its own contact form gadget, it was still considered as highly inadequate. This is because the official gadget would only be implemented on the footer the sidebar. Most bloggers preferred having a separate blogger contact form placed on its own page to make their blogs appear well arranged and more professional as well.


Having a well laid-out Blogger contact form is very important. This is the tool that visitors, companies, and brands can use to contact you and it is simply a must-have feature for every blogger. If you are not comfortable with sharing your main email address directly on your blog, then a custom Blogger contact form offers an effective way in which people can easily reach you.

Why you should use a Blogger Contact Form?

If you are still stuck on third party providers, you should definitely consider switching to the official custom contact form for Blogger since it has various unique benefits, like:
  • Messages are delivered immediately - As the blog administrator, you will receive a message immediately the visitor clicks send.
  • Reliable - It is the official form developed by Blogger, which makes it more trustworthy and reliable way to initiate contact as compared to using third-party services.
  • Questions - The contact form offers a platform for your visitors to ask specific questions that they might have regarding the blog you wrote or your business in general. It can be an excellent way of capturing leads and even lead to conversions if you are selling a certain product or service.
  • Feedback - Visitors can easily comment on your blog by leaving their feedback through your contact form. This feedback can help you determine which post to do next or what areas to address based on the visitors' comments.
  • Information or service request - For those who are using the blog as a way of marketing a product or service, potential clients can use the custom contact form for Blogger to reach out and request additional information.

How to Add Blogger Contact Form Gadget

Before adding a custom Blogger contact form to a static page, we need to add the default contact form in the blog's sidebar to make it functional:

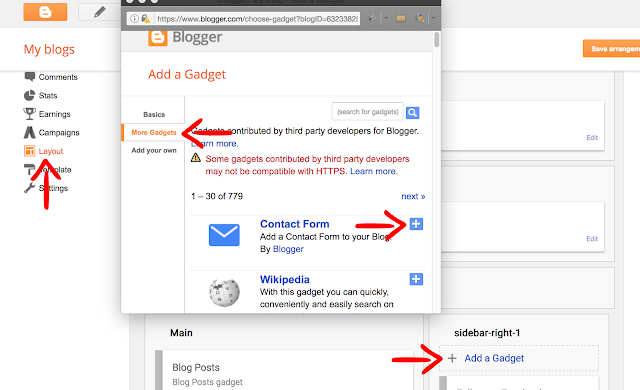
1. Log into your Blogger dashboard and go to "Layout" > click on the "Add a gadget" link on the page elements area.

2. Select "More Gadgets" below the "Basics" tab and click the "+" button to add the Contact Form Gadget.

blogger contact form

Hiding Blogger Contact Form from the Sidebar

Once the contact form has been added, next step is to hide it so that it will appear only in the static page.

1. Go to "Template" and press the "Edit HTML" button. Once the code editor opens, click anywhere inside the code area and press CTRL + F keys (or Command + F for mac) to open the search box.

2. Type or paste the following tag inside the search box and hit Enter to find it:
]]></b:skin>
3. Just above the ]]></b:skin> tag, add this CSS code:
#ContactForm1{display: none !important;}
4. Click the "Save template" button on the upper left side and view your blog. The contact form widget should be gone.

Adding Custom Blogger Contact Form in a Static Page

Finally, now that we enabled the functionality of the contact form, let's add a custom contact form in our Blogger blog...

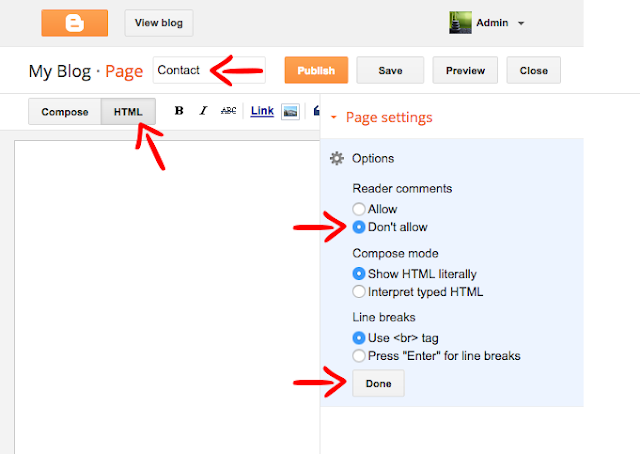
1. Go to "Pages" and click the "New page" button. If you already have a Contact us page, just click the "Edit" link below the page title.

2. Once the Page editor opens, fill up the page title with Contact/Contact Us or any title you want to show. It is recommended doing this before anything in order to make the permalink SEO friendly.

3. Click on the HTML tab as there we will add the code to make the custom Blogger contact form work. On the right site, change the Page settings to hide ("Don't allow" or "Don't allow, hide existing") the reader comments, then click the "Done" button:

contact static page

4. Below are 5 custom Blogger contact form styles. Pick your favorite and copy the code provided, then paste the code inside the HTML box of your page editor:


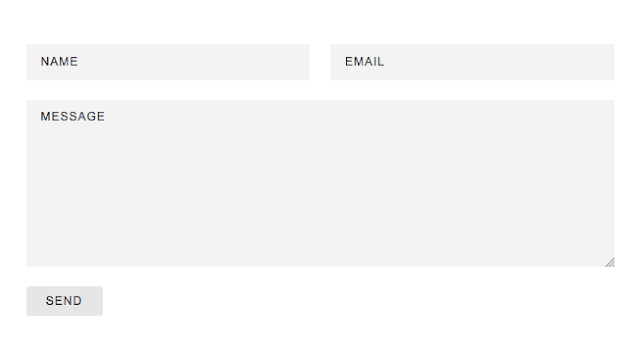
Simple Contact Form

custom blogger contact form

<style type="text/css">
.contact-form-widget{margin-left:auto;margin-right:auto;width:600px;max-width:100%;padding:40px 0}.contactf-name,.contactf-email{float:left;width:48.25%}.contactf-name{margin-right:3.5%}.contact-form-name,.contact-form-email,.contact-form-email-message,.contact-form-name:hover,.contact-form-name:focus,.contact-form-email:hover,.contact-form-email:focus,.contact-form-email-message:hover,.contact-form-email-message:focus{width:100%;max-width:100%;margin:0 0 20px;padding:10px 15px;font-size:12px;letter-spacing:1px;color:#444;background:#F3F3F3;border:medium none;-webkit-box-shadow:none;-moz-box-shadow:none;box-shadow:none}.contact-form-name,.contact-form-email{height:37px}.contact-form-email-message{height:170px}.contact-form-button-submit,.contact-form-button-submit:hover{width:13%;height:30px;font:normal 12px Arial;letter-spacing:1px;color:#444;display:block;outline:none;margin-bottom:20px;text-align:center;background:#E6E6E6;border:0;cursor:pointer}.contact-form-button-submit:active{outline:none;-webkit-box-shadow:none;box-shadow:none}.contact-form-cross{border:medium none!important;box-shadow:none!important;padding:0!important}
</style>

<div class="widget ContactForm" id="ContactForm1"><div class="contact-form-widget"><div class="form"><form name="contact-form"><div class="contactf-name"><input class="contact-form-name" id="ContactForm1_contact-form-name" name="name" size="30" type="text" value="NAME" onblur='if (this.value == "") {this.value = "NAME";}' onfocus='if (this.value == "NAME") {this.value = "";}'  /></div><div class="contactf-email"><input class="contact-form-email" id="ContactForm1_contact-form-email" name="email" size="30" type="text" value="EMAIL" onblur='if (this.value == "") {this.value = "EMAIL";}' onfocus='if (this.value == "EMAIL") {this.value = "";}'/></div><div style="clear:both"></div><div class="contactf-message"><textarea class="contact-form-email-message" cols="25" id="ContactForm1_contact-form-email-message" name="email-message" rows="5" value="MESSAGE" onblur='if (this.value == "") {this.value = "MESSAGE";}' onfocus='if (this.value == "MESSAGE") {this.value = "";}'></textarea></div><input class="contact-form-button contact-form-button-submit" id="ContactForm1_contact-form-submit" type="button" value="SEND" /><div class="contact-form-error-message" id="ContactForm1_contact-form-error-message"></div><div class="contact-form-success-message" id="ContactForm1_contact-form-success-message"></div></form></div></div></div>

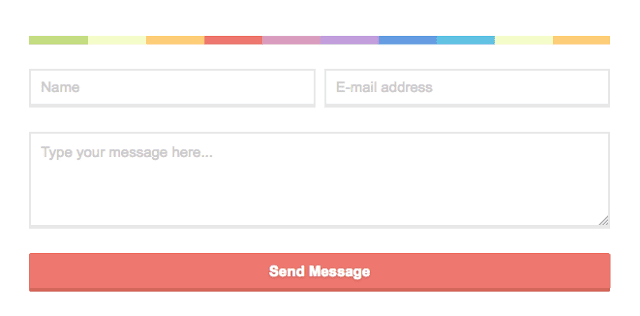
Contact form with CSS rainbow divider

colorful contact form for Blogger

<style type="text/css">
.contact-form-widget{margin-left:auto;margin-right:auto;width:600px;max-width:100%;padding:0}hr{position:relative;height:.75em;border:0;overflow:hidden;margin:0}hr:before{content:"";display:block;position:absolute;top:0;left:0;height:.75em;width:5.1em;background:#C4DD83;box-shadow:5em 0 0 0 #F4FCC9,10em 0 0 0 #FDCD78,15em 0 0 0 #ED786F,20em 0 0 0 #D99DBF,25em 0 0 0 #C39EDC,30em 0 0 0 #679DE2,35em 0 0 0 #62C2E3,40em 0 0 0 #F4FCC9,45em 0 0 0 #FDCD78,50em 0 0 0 #ED786F,55em 0 0 0 #D99DBF,60em 0 0 0 #C39EDC}.contactf-name,.contactf-email{float:left;width:49.25%}.contactf-name{margin-right:1.5%}.contact-form-name,.contact-form-email,.contact-form-email-message,.contact-form-name:hover,.contact-form-name:focus,.contact-form-email:hover,.contact-form-email:focus,.contact-form-email-message:hover,.contact-form-email-message:focus{width:100%;max-width:100%;margin:25px 0 0;padding:10px;font-size:15px;color:#ccc;border-color:#E8E8E8;border-width:2px 2px 4px;-webkit-box-shadow:none;-moz-box-shadow:none;box-shadow:none}.contact-form-name,.contact-form-email{height:40px}.contact-form-email-message{height:100px}.contact-form-button-submit,.contact-form-button-submit:hover{margin-top:25px;width:100%;height:40px;font-size:15px;color:#fff;text-align:center;text-shadow:0 1px 2px rgba(0,0,0,0.25);background:#EE786F;border:0;border-bottom:2px solid #D4685C;outline:none;cursor:pointer;-webkit-box-shadow:inset 0 -2px #D4685C;box-shadow:inset 0 -2px #D4685C}.contact-form-button-submit:active{top:1px;outline:none;-webkit-box-shadow:none;box-shadow:none}.contact-form-cross{border:medium none !important;box-shadow:none !important;padding:0 !important;}
</style>

<div class="widget ContactForm" id="ContactForm1"><div class="contact-form-widget"><hr><div class="form"><form name="contact-form"><div class="contactf-name"><input class="contact-form-name" id="ContactForm1_contact-form-name" name="name" size="30" type="text" value="Name" onblur='if (this.value == "") {this.value = "Name";}' onfocus='if (this.value == "Name") {this.value = "";}'  /></div><div class="contactf-email"><input class="contact-form-email" id="ContactForm1_contact-form-email" name="email" size="30" type="text" value="E-mail address" onblur='if (this.value == "") {this.value = "E-mail address";}' onfocus='if (this.value == "E-mail address") {this.value = "";}'/></div><div style="clear:both"></div><div class="contactf-message"><textarea class="contact-form-email-message" cols="25" id="ContactForm1_contact-form-email-message" name="email-message" rows="5" value="Type your message here..." onblur='if (this.value == "") {this.value = "Type your message here...";}' onfocus='if (this.value == "Type your message here...") {this.value = "";}'></textarea><input class="contact-form-button contact-form-button-submit" id="ContactForm1_contact-form-submit" type="button" value="Send Message" /><div class="contact-form-error-message" id="ContactForm1_contact-form-error-message"></div><div class="contact-form-success-message" id="ContactForm1_contact-form-success-message"></div></div></form></div></div></div>

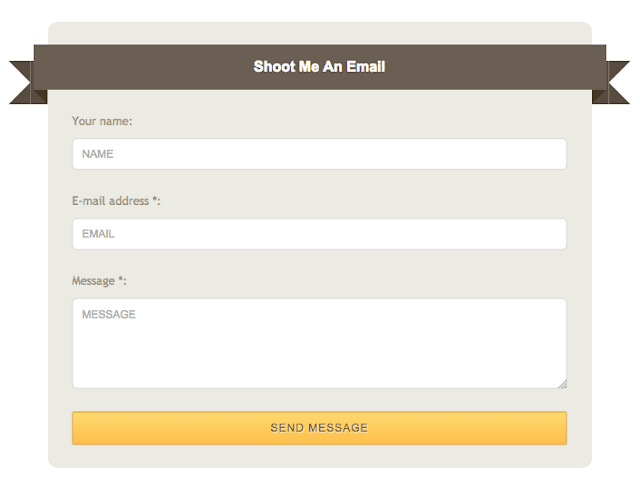
Blogger Contact Form with CSS Ribbon

contact form with ribbon

<style type="text/css">
.widget.ContactForm{z-index:1}.contact-form-widget{margin-left:auto;margin-right:auto;width:600px;max-width:100%;padding:25px 0;background:#EBEBE3;-webkit-border-radius:2%;-moz-border-radius:2%;border-radius:2%}.contact-form-widget .form{width:91%;margin:0 auto}.ribbon{font:16px Arial;text-transform:capitalize;text-shadow:0 1px 2px rgba(0,0,0,0.25);position:relative;background:#6B5F53;color:#fff;text-align:center;padding:1em 2em;margin:0 -16px}.ribbon:before,.ribbon:after{content:"";position:absolute;display:block;bottom:-1em;border:1.5em solid #584C40;z-index:-1}.ribbon:before{left:-1.7em;border-right-width:1.2em;border-left-color:transparent}.ribbon:after{right:-1.7em;border-left-width:1.2em;border-right-color:transparent}.ribbon .ribbon-content:before,.ribbon .ribbon-content:after{content:"";position:absolute;display:block;border-style:solid;border-color:#42362A transparent transparent;bottom:-1em}.ribbon .ribbon-content:before{left:0;border-width:1em 0 0 1em}.ribbon .ribbon-content:after{right:0;border-width:1em 1em 0 0}.contactf-name,.contactf-email,.contactf-message{text-align:left;margin-top:25px;color:#a1937b;font-size:13px}.contactf-name,.contactf-email{float:left;width:100%}.contact-form-name,.contact-form-email,.contact-form-email-message,.contact-form-name:hover,.contact-form-name:focus,.contact-form-email:hover,.contact-form-email:focus,.contact-form-email-message:hover,.contact-form-email-message:focus{width:100%;max-width:100%;margin:10px 0 0;padding:10px;font-size:12px;color:#aaa;border-color:#DBD6D1;border-width:1px;box-shadow:none;-webkit-border-radius:5px;-moz-border-radius:5px;border-radius:5px}.contact-form-name,.contact-form-email{height:35px}.contact-form-email-message{height:100px}.contact-form-button-submit,.contact-form-button-submit:hover{margin-top:25px;width:100%;height:37px;font:normal 12px Arial;outline:none;letter-spacing:1px;color:#fff;text-align:center;cursor:pointer;text-shadow:1px 1px 0 #ffe8b2;color:#7c5d1b;border:1px solid #d6a437;background:#febd4b;background:-webkit-gradient(linear,0 0,0 100%,from(#fed970) to(#febd4b));background:-webkit-linear-gradient(#fed970,#febd4b);background:-moz-linear-gradient(#fed970,#febd4b);background:-ms-linear-gradient(#fed970,#febd4b);background:-o-linear-gradient(#fed970,#febd4b);background:linear-gradient(#fed970,#febd4b);-pie-background:linear-gradient(#fed970,#febd4b)}.contact-form-button-submit:active{color:#7c5d1b;border:1px solid #d6a437;background:#febd4b;background:-webkit-gradient(linear,0 0,0 100%,from(#febd4b) to(#fed970));background:-webkit-linear-gradient(#febd4b,#fed970);background:-moz-linear-gradient(#febd4b,#fed970);background:-ms-linear-gradient(#febd4b,#fed970);background:-o-linear-gradient(#febd4b,#fed970);background:linear-gradient(#febd4b,#fed970);-pie-background:linear-gradient(#febd4b,#fed970)}.contact-form-cross{border:medium none!important;box-shadow:none!important;padding:0!important}
</style>

<div class="widget ContactForm" id="ContactForm1"><div class="contact-form-widget"><h2 class="ribbon"><strong class="ribbon-content">Shoot Me an Email</strong></h2><div class="form"><form name="contact-form"><div class="contactf-name">Your name:<input class="contact-form-name" id="ContactForm1_contact-form-name" name="name" size="30" type="text" value="Name" onblur='if (this.value == "") {this.value = "Name";}' onfocus='if (this.value == "Name") {this.value = "";}'  /></div><div class="contactf-email">E-mail address *:<input class="contact-form-email" id="ContactForm1_contact-form-email" name="email" size="30" type="text" value="E-mail address" onblur='if (this.value == "") {this.value = "E-mail address";}' onfocus='if (this.value == "E-mail address") {this.value = "";}'/></div><div style="clear:both"></div><div class="contactf-message">Message *:<textarea class="contact-form-email-message" cols="25" id="ContactForm1_contact-form-email-message" name="email-message" rows="5" value="" placeholder="Type your message here..."></textarea><input class="contact-form-button contact-form-button-submit" id="ContactForm1_contact-form-submit" type="button" value="SEND MESSAGE" /><div class="contact-form-error-message" id="ContactForm1_contact-form-error-message"></div><div class="contact-form-success-message" id="ContactForm1_contact-form-success-message"></div></div></form></div></div></div>

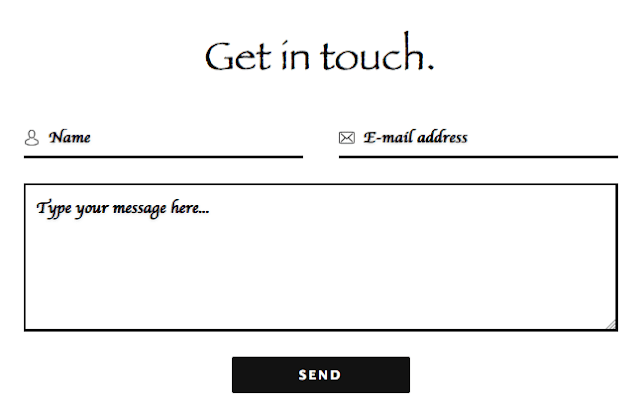
Minimal Contact Form

minimal contact form for Blogger

<style type="text/css">
.contact-form-widget{margin-left:auto;margin-right:auto;width:600px;max-width:100%;padding:25px;background:#fff}.contact-title{text-align:center;font:41px fantasy;color:#121212;margin-bottom:25px}.contactf-name,.contactf-email{float:left;width:47%}.contactf-name{margin-right:6%}.name-icon img,.email-icon img{background:transparent!important;border:medium none!important;box-shadow:none!important;padding:11px 0!important}.name-icon,.email-icon{position:absolute;z-index:1}.contact-form-name,.contact-form-email,.contact-form-email-message,.contact-form-name:hover,.contact-form-name:focus,.contact-form-email:hover,.contact-form-email:focus,.contact-form-email-message:hover,.contact-form-email-message:focus{width:100%;max-width:100%;margin:0 0 25px;padding:10px 10px 10px 25px;font:bold 16px cursive;text-shadow:0 1px 2px #ddd;color:#121212;background:transparent!important;border-color:#121212;border-width:0 0 2.5px;-webkit-box-shadow:none;-moz-box-shadow:none;box-shadow:none}.contact-form-name,.contact-form-email{height:40px}.contact-form-email-message,.contact-form-email-message:hover,.contact-form-email-message:focus{padding:10px!important}.contact-form-email-message{height:150px;border-width:2.5px!important}.contact-form-button-submit,.contact-form-button-submit:hover{background:#121212!important;width:30%;height:37px;font:bold 13px "Lucida Grande";letter-spacing:2px;color:#fff;text-align:center;border:medium none;cursor:pointer;display:block;margin:0 auto;outline:none}.contact-form-cross{border:medium none!important;box-shadow:none!important;padding:0!important}
</style>

<div class="widget ContactForm" id="ContactForm1"><div class="contact-form-widget"><h2 class="contact-title">Get in touch.</h2><div class="form"><form name="contact-form"><div class="contactf-name"><div class="name-icon"><img src="https://blogger.googleusercontent.com/img/b/R29vZ2xl/AVvXsEhtKeqUnyzwMLttJCSOzZVQJDZjgEHuDSQsShLHrO7DV818KWUAuwnYnquEqAYwX8x3HbcBzwRaXs2Mi1OZwfnFa0vuhn5l699HTBMcDfpDcO-RS6pJn7w4n6i7wmgkhfTcciaJVeevxPKX/s1600/avatar%25281%2529.png" width="16" height="16" /></div><input class="contact-form-name" id="ContactForm1_contact-form-name" name="name" size="30" type="text" value="Name" onblur='if (this.value == "") {this.value = "Name";}' onfocus='if (this.value == "Name") {this.value = "";}'  /></div><div class="contactf-email"><div class="email-icon"><img src="https://blogger.googleusercontent.com/img/b/R29vZ2xl/AVvXsEj1i-OqyNwvyg3XgHbNzV_itP3nftkpSAv9va9W_NHX4BDW6Lg2dWz9i-RTIGaSpHQjmEohK5xby5uYQqGlz2ZLpeCCf9tWK1JAq_i0zkab7S_cMktQDm4hpsNdIO3lCdgDQumAgS83fTMP/s1600/envelope%25281%2529.png" width="16" height="16" /></div><input class="contact-form-email" id="ContactForm1_contact-form-email" name="email" size="30" type="text" value="E-mail address" onblur='if (this.value == "") {this.value = "E-mail address";}' onfocus='if (this.value == "E-mail address") {this.value = "";}'/></div><div style="clear:both"></div><div class="contactf-message"><textarea class="contact-form-email-message" cols="25" id="ContactForm1_contact-form-email-message" name="email-message" rows="5" value="Type your message here..." onblur='if (this.value == "") {this.value = "Type your message here...";}' onfocus='if (this.value == "Type your message here...") {this.value = "";}'></textarea><input class="contact-form-button contact-form-button-submit" id="ContactForm1_contact-form-submit" type="button" value="SEND" /><div class="contact-form-error-message" id="ContactForm1_contact-form-error-message"></div><div class="contact-form-success-message" id="ContactForm1_contact-form-success-message"></div></div></form></div></div></div>

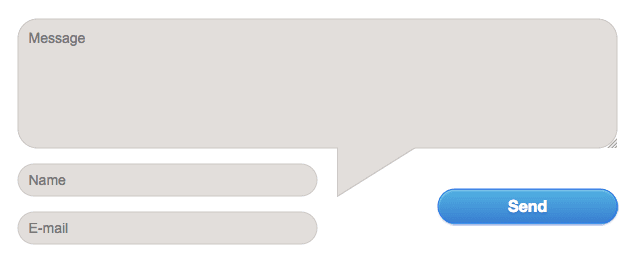
Contact form with speech bubble


<style type="text/css">
.contact-form-widget{margin-left:auto;margin-right:auto;width:600px;max-width:100%}.contactf-name,.contactf-email{float:left;width:50%}.contact-form-name,.contact-form-email,.contact-form-email-message,.contact-form-name:hover,.contact-form-name:focus,.contact-form-email:hover,.contact-form-email:focus,.contact-form-email-message:hover,.contact-form-email-message:focus{width:100%;max-width:100%;margin:0 0 15px;padding:10px;font-size:14px;color:#777;background:#E2DEDB;border:1px solid #CBC7C4;-webkit-box-shadow:none;-moz-box-shadow:none;box-shadow:none;-webkit-border-radius:20px;-moz-border-radius:20px;border-radius:20px}.contact-form-name,.contact-form-email{height:33px}.contact-form-email-message{height:130px}.contactf-message{position:relative}.contactf-message:after,.contactf-message:before{border-bottom:50px solid transparent;border-left:80px solid #E2DEDB;bottom:-32px;content:'';position:absolute;right:50%;margin-right:-100px}.contactf-message:before{border-left:80px solid #CBC7C4;bottom:-34px;right:50.3%;margin-right:-101px}.cbluebutton{margin-top:25px;width:30%;height:35px;float:right;font-size:15px;color:#fff;display:inline-block;text-align:center;background:linear-gradient(to bottom,#339ad9 0%,#224bbc 100%);box-shadow:0 1px 1px rgba(34,75,188,0.5);border:0;-webkit-border-radius:20px;-moz-border-radius:20px;border-radius:20px}.cbluebutton span .contact-form-button-submit{background:linear-gradient(to bottom,#52b1e2 0%,#397fd0 100%);font:bold 16px "Helvetica Neue",sans-serif;height:35px;width:100%;color:#FFF;text-shadow:0 1px 1px #224BBC;display:inline-block;box-shadow:0 1px 1px rgba(255,255,255,0.3) inset;cursor:pointer;outline:none;-webkit-border-radius:20px;-moz-border-radius:20px;border-radius:20px}.contact-form-button-submit:active{top:1px;outline:none;-webkit-box-shadow:none;box-shadow:none}.contact-form-cross{border:medium none!important;box-shadow:none!important;padding:0!important}
</style>

<div class="widget ContactForm" id="ContactForm1"><div class="contact-form-widget"><div class="form"><form name="contact-form"><div class="contactf-message"><textarea class="contact-form-email-message" cols="25" id="ContactForm1_contact-form-email-message" name="email-message" rows="5" value="Message" onblur='if (this.value == "") {this.value = "Message";}' onfocus='if (this.value == "Message") {this.value = "";}'></textarea></div><div class="cbluebutton"><span><input class="contact-form-button contact-form-button-submit" id="ContactForm1_contact-form-submit" type="button" value="Send" /></span></div><div class="contactf-name"><input class="contact-form-name" id="ContactForm1_contact-form-name" name="name" size="30" type="text" value="Name" onblur='if (this.value == "") {this.value = "Name";}' onfocus='if (this.value == "Name") {this.value = "";}'  /></div><div class="contactf-email"><input class="contact-form-email" id="ContactForm1_contact-form-email" name="email" size="30" type="text" value="E-mail" onblur='if (this.value == "") {this.value = "E-mail";}' onfocus='if (this.value == "E-mail") {this.value = "";}'/></div><div style="clear:both"></div><div class="contact-form-error-message" id="ContactForm1_contact-form-error-message"></div><div class="contact-form-success-message" id="ContactForm1_contact-form-success-message"></div></div></form></div></div>

5. After you added the code, click the "Publish" button on the upper right side. Now you should be able to see the Blogger contact form live on your static page. To ensure that everything works fine, you can send a message as a test. The message should be delivered to your inbox in a matter of seconds, just make sure that you're checking the email that you're using with your Blogger account.

Frequently Asked Questions about the Custom Contact Form for Blogger

Where do the messages go?

Once a visitor asks a question or sends feedback through the Blogger contact form, it is instantly delivered to the email associated with your Blogger account. If a blog has several administrators, then all the individual administrators will receive the comments or questions asked by the visitor.

What is the benefit of using a separate "Contact Us" page?

Even though it all comes down to your personal preferences, your blog will look more professional if it has a separate page for the custom contact form for Blogger. It gives you credibility and also offers you the chance to add a specific call to action in the new "Contact Us" page.

Is it possible to add extra fields?

Unfortunately, no. You can't add custom fields such as website, phone number or mailing address since Blogger uses special tags in order to transfer data. In any case, the default fields are well laid-out and will help you to get the basic information you need about your visitors.

I have installed the Blogger contact form, but it is not working. What could be the problem?

There are several reasons why you may be having trouble setting up your contact form. The simplest way to troubleshoot is to countercheck the email you linked to the blog and also reinstall the form again.

Ultimately, by using the custom Blogger contact form you gain from consistency in the type of information you request and also reduce spam since you will not have to display your email directly on the blog.

How to Start a Blog with Blogger Account

Are you wondering how to create a Blogger account? Many of us do, because Blogger is one of the most popular blogging platforms out there and it can provide us with an extraordinary, fun way to express ourselves in the online world. Not only is it Blogger a very large blogging website, but it's also full of categories that you can blog on. You have complete control over what you want to blog, and that does make Blogger an amazing platform to begin with. Yet you do have to wonder how to create a blog on Blogger! We are here to help you understand all of that and so much more as fast as possible, thanks to a detailed guide that will showcase all the necessary instructions in a very easy to read manner.


Creating a Google account

What you need to know here is that Google owns Blogger, and because of that you will need to use a Google account to sign in to this platform. You can create a Google account now and then you will be able to continue to the platform without a problem. By creating a Google Account you will be able to access a wide range of Google apps and services like Drive or Mail for example. Visit the page above and share all the necessary information in order to create the necessary Google Account. Thankfully, the process is very easy and it will take only a few minutes of your time. In case you already have a Google Account, you will need to sign on the Blogger page.

create a google account

Creating your blog

Once you are located on the Blogger page, you will need to press the New Blog button in order to start a blog. You will receive a new window where you will learn how to create a Blogger account. This will enable you to share all the necessary information.
  • Make sure that you add a title for your blog in the Title area. This is very important because it will allow you to entice the visitor to read more about you and your content. So, try to make the title relevant and appealing
  • In order for users to find your blog, you will need to create an Address for it. Your blog will have a blogspot.com address, but you will need to choose what goes before blogspot.com. Basically, you can opt for something like abcdef.blogspot.com or anything like that. Remember that this can be modified in the long run. The great thing here is that you will immediately be able to see if that address is available or not. This means you will have the ability to check the address availability really fast.
  • The next step will require you to choose from any of the presets that are available at this point. Starting with a Template is a good idea, but do remember that this can be modified afterwards as well. So it's a good idea to just pick a template and move onward.
create a blogger account

Once you have the blog title, address and template ready to go, you will have to press the Create blog! button. This process will take a little bit until it's completed properly, so just wait for a few seconds as the new blog will soon be added to the blog list. So, if you were wondering how to create a blog on Blogger, this is the simplest way to do it.

Maybe the best thing about how to create a Blogger account is that the entire process is very easy to do. Even beginners will have no problem creating and setting up an account. The customization options are plentiful here, so you shouldn't have any problem setting your account really fast!

Starting to post

Although the blog address will be available, you can't call that a blog unless you start writing content in there. Obviously, you will need to learn how to write a post on Blogger, and we are here to help you with that right now.

In order to start writing, you will need to click the Create a new post link or you can press the New Post button. Once you do that, you will gain immediate access to the post editor and here you can write the blog as well as make any necessary changes to content that you already wrote.

create new blogger post

Write a title for your post

Your post needs to have a title. Towards the top of the Blogger editor you will see that there is a Post title box. Add in the desired post title there. This shouldn't eat up a lot of your time, just try to come up with a post title that is enticing, very easy to use and a delight to read for your audience. A catchy title can be great. Don't opt for the clickbait title that you can see nowadays, make your title feel informative and fun to read as that's what you want. If you want to write a first post, you need to make it introductory. Write about the goals you have, the type of content you want to add and so on. It will not be easy to write down the first words, but if you create a good title it will be easier for you to translate thoughts into words!

create blogger post title

Start the writing process

You can create a Blogger post in 2 ways. You can either write the post in HTML or you can use the word processor included here. You have a button located in the top left corner which helps you switch between any of these two writing models. The HTML editor helps you create better web content and you can also use it to insert some special web functions. On the other hand, the word processor is more than qualified to offer you all the extra help you might need here.

blogger post compose html

Customizing text

If you want, you will be able to customize the text you want without a problem. You will have the ability to use the toolbar located on top of the editor to modify the text as you see fit. This includes formatting, color, size, alignment and so on. You have a Normal drop-down that helps you change the type of content you want to add, so you should consider changing between the desired heading type as you see fit. This also changes the way search engines process your content, so keep that in mind.  If possible, try to break the content into easy to read pieces. Use the Headings in a strategic manner.

blogger post heading

Add an image to your post

If you want to make your blog post enticing, you should try to add at least an image. These images make posts a lot easier to read and it's a good idea to make the most out of images if you want to share a great experience for your audience. You will have an "Insert Image" button right above your text editor, on the toolbar. There are multiple options, you can either upload them from your PC/Mac, you can share a link or you can use your webcam to take a picture if you want. However, if you link to other websites, make sure that you showcase their copyright or just refrain from doing that to begin with. There are many sites who do not agree with the idea of having their content stolen, so try to stay away from that!

insert image in Blogger post

Modify the post settings

If you look on the right side of your Post Editor, you will be able to access some Post settings. Remember that these make it easy for you to customize your post right before you choose to publish it!

blogger post settings
  • Labels are useful if you want to group multiple posts which are very similar to one another.
  • Schedule allows you to publish your content at a later date. It can come in handy if you don't want to share multiple articles at the same time.
  • Permalink is an option that allows you to select the way your post will be linked to in the future. Usually it will maintain the title structure, but there are other link types you can choose from as well.
  • Location enables you to add a location tag for your post. It's a very good tool for those that move/travel often
  • Options allows you to modify some features like the user ability to comment on a post for example. You can also choose the way your HTML code is interpreted here as well.

Previewing

A great thing about previewing your post is that you will be able to see how it looks when a reader will access it. This is the right time when you need to check your post for any errors, be it grammar or structural ones.

preview blogger post

Save the post for later

This is not the same as scheduling. When you save the post for later, it means that the post just isn't finished at this time and you will continue to work on it at a later time. You can see this as a draft for your future post.

save blogger post

Publishing the post

If you double or triple checked the post and there are no errors, then you are good to go. Still, it's a good idea to go through it at least one more time to ensure that all the content you want is there and you don't have to make any more changes. Add all the necessary labels and tags, make sure that you inserted any links, images and other information that you might need.

Once everything is ready, you will just have to press the Publish button located at the top of the panel. This is when Blogger will automatically redirect you to the Posts page. Here you will see the post right on top.

publish blogger post


Don't believe that your work is done at this point. In fact, it's far from that. You still have a long way to go before you properly optimize and improve your blog. After all, people won't be drawn in to your blog if you have just a single one to begin with. Work hard to write great posts as they will be able to make your blog stand out in the long haul.

Of course, you do need patience. Writing a good blog does require time and you shouldn't rush the content creation. Prioritize quality over quantity all the time. If you don't do that, the experience will be very well worth it in the end.

How can you expand your blog?

As we mentioned earlier, writing a single post is great but it won't draw in a lot of traffic. If you want to write a good post, one that will bring in lots of readers and views, you want to post as often as possible.

Quality content will always bring in traffic. Update the blog as often as you can. If you can share at least a post per week, you should do that. A good stream of posts will always come in handy, so make sure that you always write some good, enticing content that will help populate your blog.

If possible, we recommend you to create a post Schedule as this will help you better optimize the way you post. This way you will be able to prepare your content beforehand, so you can have it ready when you want to create a new post. The best approach is to write more than 1 post at a time. One can be posted and the others can be kept for a later date if you so desire.

create blogger posts

Write for a niche

Generalized content works but it won't really deliver good results for your audience. If you want to get the best results, we recommend you to find a niche as fast as possible. Not only does a niche help you target specific users, but it will also help you become an authority on that topic. We recommend you to research a niche and become an expert on it. This is the best way to create a large audience for a niche and from here to reaching success in blogging will be just a small step.

Don't rush the content creation process, especially if you write for a niche. Creating redundant content will just keep people away. As long as you take your time and focus on results for your audience, the experience will be an amazing one. Of course, use the proper content structure in order to cater to the needs of search engines, all while maintaining the content relevant for humans as well!

Reader interaction

Once you learn how to create a blog on Blogger you can create more than a blog in order to reach multiple audiences. But the idea here still remains, you will need to interact with the audience. The community will grow more and more as you put out content, so make sure that you always interact with the audience.

Read the comments and moderate them, make sure that you remove spam. Also, reply to people that are interested in what you write. This will help create and nurture a community around your content, which can be very interesting to do!

blogger comments

Advertising your blog

Your blog will need advertising if you want it to grow really fast. One of the best ways you can do that is by sharing it with people anywhere you can. From social networks to social media or any other location, all of these are great places where you can share your blog. We recommend you to try and do the following:
  • Post a short headline and a link to your article on Twitter
  • Single Blogger is a Google Product, make sure that you use the Google buttons in order to share on Google Plus and perform other similar actions.
  • Encourage readers and friends to share your Blogger posts on Facebook and anywhere they can. This will help you reach a large audience really fast.
  • Make sure that you comment on forums and other blogs. Link to your post there if it's meaningful for that particular topic. This type of practice is called backlinking and it's very good for SEO.

Place ads

Ads are very important if you want to monetize the blog. You won't be able to monetize your blog with AdSense unless you have a blog active for around 6 months, so keep that in mind. You also need to have at least 18 years of age and you also have to obey the TOS. AdSense allows you to receive payments based on the amount of impressions generated by your blog.

sign up for AdSense

Blog customization

You can modify just about anything you want on Blogger, it all comes down to you to make the right changes! For example, you will be able to press Layout and then you can modify the block content for each section of your blog. You also have the ability to Add a Gadget if you want. Blogger has lots of add-ons to choose from, all of which can help you better define your blog!

If you want to customize your Template, keep in mind that there are multiple customization options to choose from. You can also keep the template you have now. Programmers can press the Edit HTML button so they can modify the CSS and HTML code.

blogger template edit HTML

Stat tracking

Blogger has a dedicated option named Stats where you have the ability to monitor the blog performance. Here you have the ability to see the amount of views you get. This way you can identify what posts are performing better than others. As a result, you know what content works great for your audience in the longer term!

Learning how to create a Blogger account is really easy and you can feel free to create multiple blogs if you want. Just make sure that you write content for all of them. Plus, you can also monetize each one of your blogs if you so desire. Take your time and make sure that you provide valid information for your readers. This should be the main reason to create a Blogger account in the first place!

Gadget