Showing posts with label Social Tricks. Show all posts

How To Check Who Blocked You On Instagram

How To Check Who Blocked You On Instagram
In recent years, there has been a tremendous increase in the sale and use of smartphones. This is because of spreading of internet connectivity and emerging of new mobile OS. Today, there are two main mobile operating systems, Android and iOS. They both are so loved by their users because of the App markets and ecosystems. Users love the idea of adding new features in their phones just by downloading an app rather than buying a new device. There are so many categories of apps out of which some apps such as Whatsapp, Facebook and Instagram are the most popular in social apps. Instagram has evolved into a full social network from just a photo sharing platform ever since it was acquired by facebook. People love sharing on Instagram even more than facebook. It also offers direct messaging and now copying snap chat, it offers stories and disappearing messages as well.

Blocking On Instagram.

With such an evolution of Instagram into a full-blown social network, people are more concerned about privacy, security and copyrights on Instagram. To tackle with such difficulties, Instagram has added various security features such as making posts private, copyright claims on music, reporting spam and blocking users. The best part about blocking someone is the fact that the blocked user has no idea that they have been blocked unless they notice it themselves. This may be very annoying for the user getting blocked. Sometimes Instagram bans your accounts so it is important to keep track and check who blocked on Instagram in case number becomes too high. This is especially in the case of marketing accounts, or people who post spam comments on celebrity posts and more.
instagram login
So, if you are in such a situation where you need to track the number of users or need to know who blocked you on Instagram, we have the solution you need.

How To Check Who Blocked You On Instagram.

Method 1:- Download Analytics App (InstaFollow).

There are a number of Instagram analytic apps that constantly monitor your account for details and statistics about followers, active users, ghost users and more. Some good analytic apps also let you track who blocked you on Instagram. Here is an example.
Steps to check who blocked you on Instagram with InstaFollow.
Step 1. Download Instafollow from the Google Playstore Link given below.
instafollow
Download From PlaystoreStep 2. Sign in with your Instagram account and give all the necessary permissions.
Step 3. Head to the Followers Insight page and tap on Blockers.
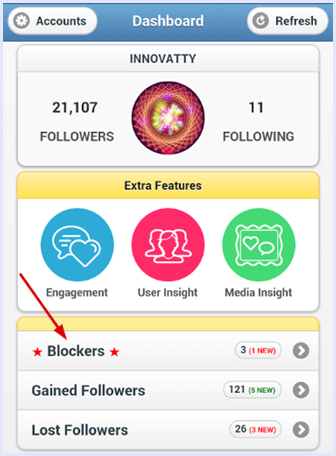
blockers on instafollow
Here you will see a list of all the accounts that have blocked you on Instagram. This features paid and may require money to unlock as this is a pro feature. If you want to use the free method, try the one given below.

Method 2:- Try Following.

There is a chance that you might have a suspicion on someone that might have blocked you. Here are some points that you can check to verify if a user has blocked you on Instagram.
  • Go to their profile and try re-following them. If it doesn’t work, they have blocked you.
  • You won’t be able to see the feed of someone who has an open account if they have blocked you. Try opening via your friends account to double check.
  • The conversation thread will no longer show the username and will not deliver any messages or show seen stamp.
Hence, these are the ways to check who blocked you on Instagram.
In conclusion, these are the best ways to check who blocked you on Instagram. Share your experiences and thoughts in the comments below to start a discussion. Feel free to contact us in case you require any assistance.

Add All Facebook Friends in Group By Single Click 2017

Add All Facebook Friends in Group By Single Click 2017
Add All Friends To Facebook Group By Single Click
Facebook groups are best place for any discussion with your unique choice friends or other members. No one from outside can interfere in group without admin permission means groups are totally different from pages. In pages every person is free to like page. Groups can be secret, closed or public. But the problem we face in groups is that, we have to add all member manually one by one, which is time consuming process. As in our recent post we have discussed about Invite All Friends to Facebook Page. It is helpful for inviting too many friend to Facebook page within few secs and its totally a time saving method. But that process is only working only for Facebook page not for Facebook group. Today we will discuss about methods to add all member in Facebook group in a single click. Sometimes we have an account with 5000 or more friends. So its not an easy task to add too many friends and you face difficulty while adding them one by one. Don’t worry we care about your precious time and effort so therefore here is simplest and easiest way which will help you to add all friends to Facebook group within a single click.

How To Add All Friends To Facebook Group At Once.

So here we have a simple guide for you about How To Add All Friends To Facebook Group At Once in a single click. Make sure you follow these steps carefully. They are quite easy and very convenient to follow.

Steps To Add Friends Using Browser Script

  •  First of all Log in into that Facebook account whose friends you want to invite.
  •  Then open your particular Facebook Group in which you want to add friends.
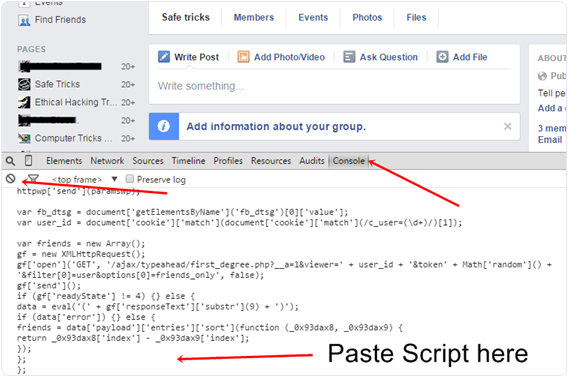
  •  Now Click F12 button to open debugger and then select console box.
  •  Now copy script from below given button.
  •  Copy paste the whole provided code and then paste them into console box.
add all friends to facebook group script code
  • Press enter and process will start for sending invitation.

Steps To Add Friends In Group Using Chrome Extension.

In case above script doesn’t works for you then another easy way is by installing Google Chrome extension.
  • First all download below given extension on chrome browser.
Add to chrome button icon
  • After downloading and installation, open your Facebook group where you want to add friends.
  • Then simply click on visible icon on top right corner of browser to perform this task.
  • Without few min process of adding friends will begin.
Note:- Don’t worry about anything this script is totally safe. It will not mess with your account, or compromise it’s security. But due to Facebook policy, In case you have too many friends then you may get blocked for using groups or even your account may get locked. So be careful about Facebook rules for spamming and socializing.

How To Permanently Delete Your Facebook account

How to permanently delete your Facebook account


Facebook can be a great tool for staying in touch with friends and family but, for some people, the constant bombardment of updates, messages, likes, pokes and advertisements can all become a bit overwhelming, not to mention highly addictive.
In a study by researchers at the University of Winchester, ten self-confessed Facebook “addicts” were asked to stop using their accounts for four weeks. Many quickly became isolated from friends and family and reported feeling "cut off from the world".
Ongoing questions over user Facebook's privacy practices – including a class action lawsuit in Austria involving 25,000 users that claim Facebook illegally tracked users’ browsing habits via software installed on other web pages, and participated in “Prism”, the American spy programme – are also making some people reconsider their membership of the social network.
If you've had enough and want to get rid of your account, you have two options. You can either deactivate you account, which means your profile disappears from the social network but all the information in your account is saved on Facebook's servers in case you decide yo go back, or you can permanently delete your account, which means all your data is removed and you will not be able to regain access.
Depending on whether or not you think you might want to return, here's what you need to do:

How to deactivate your account

Deactivating your account temporarily means you have the option to return to Facebook whenever you want.

  • Click the downward arrow at the top right of any Facebook page
  • Select "Settings"
  • Click "Security" in the left column
  • Choose "Deactivate your account", then follow the steps to confirm

If you deactivate your account your profile won’t be visible to other people on Facebook and people won’t be able to search for you, but some information, such as messages you sent to friends, may still be visible to others.
If decide you'd like to go back to Facebook, you can reactivate your account at any time by logging in with your email and password. Your profile will be restored in its entirety.

How to permanently delete your account

If you don't think you'll use Facebook again, you can request to have your account permanently deleted. However, after an account has been deleted it won't be possible to reactivate your account or retrieve anything you've shared on your profile.

Before you do this, you may want to download a copy of your information from Facebook:


  • Click the downward arrow at the top right of any Facebook page
  • Select "Settings"
  • Click on the link at the bottom of the main menu that says “Download a copy of your Facebook data”.

Then you need to go to https://www.facebook.com/help/delete_account, click on "Delete my account", then follow the steps to confirm.
It may take up to 14 days for Facebook to delete all of the things you've posted, like your photos, status updates or other data stored in backup systems. While Facebook is deleting this information, it is inaccessible to other people using the social network.
Some of the things you do on Facebook aren’t stored in your account. For example, a friend may still have messages from you in their inbox. That information will remain even after you delete your account, so you will need to contact the recipients of you want it removed.

How To Combine Facebook Profile Picture And Cover Photo

How To Combine Facebook Profile Picture And Cover Photo
Whenever we hear the word social network, the first thing that instantly pops up in our head is Facebook. Facebook is without a doubt, the biggest social networking site on earth. It is one of the main reasons that got the masses to join the internet. Facebook has the highest active user base and no other site can compete to the traffic Facebook generates. This is because Facebook keeps adding new features and ways to keep people interested. But in spite of all the given features on Facebook, people look for ways to make their timeline unique and impressive. And we have great way to do it that we are going to share with you. The best feature of one’s Facebook timeline is the cover photo as well as the profile picture. These are the most notable things that are noticed the very first. Today, we will tell you how you can combine Facebook profile picture and cover photo to make them a single banner. This looks very beautiful and appeals to your visitors. If you crop manually, you won’t be able to combine your profile picture and cover photo. Hence, in this article we are going to give you a simple and easy to follow guide on how to combine your Facebook profile picture and cover photo. So let us begin.

How To Combine Facebook Profile Picture And Cover Photo. ?

Given below are simple and easy to follow steps on how to combine your Facebook profile picture and cover photo. Follow them and you can easily create a visual masterpiece for your Facebook timeline. We just have to upload the photo from which this service will cut down exactly same portion which will be used for profile and cover location and results as combination.

Steps To Combine Facebook Profile Picture And Cover Photo Are:

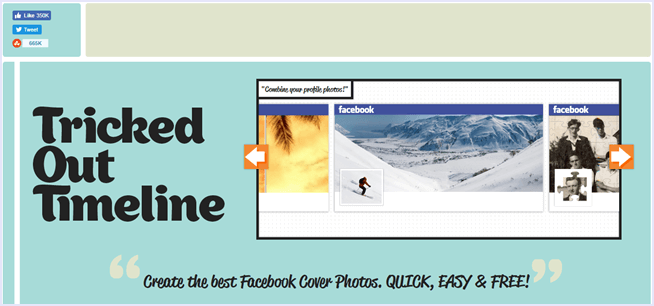
Step 1. Click the link given below to access the combine Facebook profile picture and cover photo tool.
tricked your timeline combine profile picture
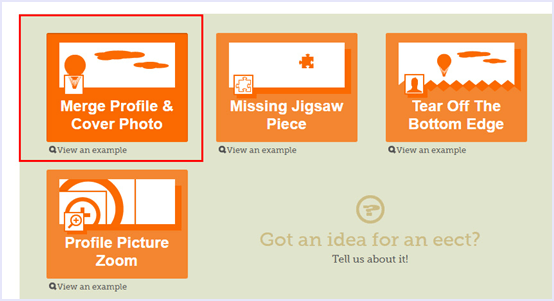
Step 2. Then, click on “Merge profile picture and cover photo” option.
merge facebook profile and cover photo
Step 3. Now you have two options. You can either upload a photo or import your current Facebook cover pic. Choose accordingly.
upload import image
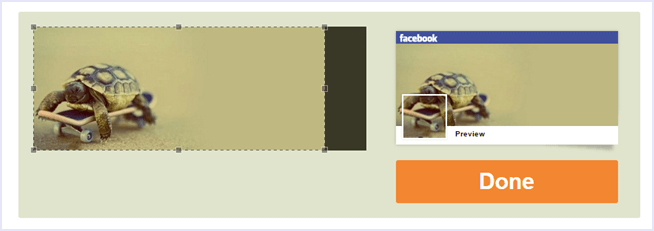
Step 4. Once the uploading is complete, you will be able to see a preview of your creation. If you are satisfied, click “Done”.
preview merged image
Step 5. Now, all you have to do is download the profile picture as well as the cover photo separately.
download profile and cover photo
Step 6. Then, upload the images you just downloaded to you Facebook profile as you profile picture and cover photo.
And now you have successfully combined Facebook profile picture and cover photo.
In conclusion, this is the easiest method to combine Facebook profile picture and cover photo. Share your profile with as and tell us your experience in the comments below. All your suggestions are welcome.

How To Change Your Facebook Name Before 60 Days After Limit 2017

Hello Friends In This Post I will Share with you That How To Change Facebook Name Before 60 Days After the limit. Facebook Is the best Place to Chat With your Friends and intact with your friends By the chatting On Facebook Group. You Can Also Do Free call by using of Facebook Messenger. Facebook Basically allow us to change name only one or two time in 60 days But By Using this method you can easily change your name before 60 days. By Using Facebook We can also know easily What’s in the trends and Viral. Facebook Is basically use to share their memories, status, Images and photos etc. but for Making A Facebook account we have to provide some information like email ids Mobile numbers thats it these are much sufficient As well as we have to also provide personal information [Date of birth, Name, Profile Pictures, Bio, HomeTown] By which Friends can easily search my profile.


Change Your Facebook Name Before 60 Days After Limit 2017


Change Your Facebook Name Before 60 Days After Limit 2017

Procedure to change facebook name Before 60 day’s After Limit.

First Of All Go to Setting then Click On General Account Setting And Click Edit Name Then Confirm That Limit Is currently present Or Not.
If The Name Limit Is present then You are not able to click On name. and their should be a note About Name Change limit, Which are:-You can't change your name at this time because you've already changedit within the last 60 days
After The confirming Limit If you want to continue the changing name then follow the some steps below
  • Firstly Go to here Change Facebook Name.
  • Then Click On Continue Button, You are not able to click on your Name.
Change Your Facebook Name Before 60 Days After Limit 2017

Change Your Facebook Name Before 60 Days After Limit 2017

  • After that change the password but no need to change any other information ( Email Id’s, Mobile Number. Etc)
  • After Click On next they will show message that you have Recently Changed Your Account Name.
  • then all the previously used names will displayed which are you used earlier and select any of the listed name available there.
Change Your Facebook Name Before 60 Days After Limit 2017

NOTE:- By Using This Method You Can change your name Unlimited Infinite time. But you are not able to Use New Name. But This Is enough for Us.
Thankyou If you want any time of help or not able to change then feel free to comment here I will try my best to solve your problem. So lets follow above guide on how to change facebook name before 60 days trick.

Final Verdict

So Guys, By using this Easy guide you will know the fb name change limit hack. So just follow above step by step guide for change fb name after limit – & – remove limit forever. if you face any problem then simple Comment in below.

Steps To Prevent Your Facebook Account To Be Hacked

There are a lot of ways to lose control of your Facebook account. You may get hacked and ultimately loose Control over your facebook account
Certainly this is not the end of the world, but be aware that you can also be the victim of an attack by malicious softwares and hackers causing much more damage on your ​ ​Facebook account. It is very important to Prevent Fb Accounts from Being Hacked.

Indeed , while no software installed on your local system, there is nothing that your local antivirus can detect and your account may be hacked in one-of- hand trick, leading to all sorts of hassles and problems . So today in this article we will discuss some Basic Tips to Prevent Fb Accounts from Being Hacked.

TIPS TO PREVENT FB ACCOUNTS FROM BEING HACKED


1)APPLICATION PERMISSION

Whenever on Facebook you answer a quiz , install a Facebook game, or add any application , you will be forced to go through an intermediate screen showing what the permissions the application needs . These permissions can include almost anything, which may also include full access to your Facebook account , even when you’re not connected.
In other words, if you do not carefully read the permissions required , you might end up giving more than just personal information, so beware next time and Prevent Fb Accounts from Being Hacked !

2) SPAMMY VIDEO LINKS:

Also Beware of videos on Facebook, Spammers are targeting Facebook to Spread links of Spammy videos, Which on your click redirects you and takes control of your fb account to Spam on other fb comments, you might not be even aware that you have commented so and so thing on so and so palce.

3)DOWNLOAD NOTIFICATION:

Sometimes when you start a video , you receive a notification that you need to install or update a codec , which is necessary and essential to watch the clip.
That may be true, but its often said that codec is actually a Trojan horse . For those who do not know , be aware that antivirus program is blocking it , although it could still slip through the net and suddenly be harmful for you. So be very smart when you come accross this situation and Prevent Fb Accounts from Being Hacked.

4) MESSAGE FROM FACEBOOK:

If you own Popular Facebook pages, then you may even recieve Messages with names like : Facebook team, Security team, Facebook Security, etc, etc.
The Message would so legit that you will be Forced to click on Some link, Which are actually Cookie stealing apps and eventually you may end up loosing your facebook account so better ignore that message and Prevent Fb Accounts from Being Hacked.
No Facebook team will never Send you such messages, so Dont forget to Report that message.

PROTECT YOURSELF:

Facebook continues to work on security even within its platform, but the social giant can not help you to provide your personal information to play a game or a quiz . In addition, a local antivirus will not prevent this error.
Ultimately it is up to you to pay attention and Prevent yourself:
  • Add your phone number and Change its privacy to Only me, So Even if there is any problem in your fb account you may easily get it back by making facebook send you Code to your Mobile. And Changing your Phone number Privacy to Only me Will make sure that other people will not be able to see your Phone number.
  • Add Security Question as a Secondary option to get back your Facebook account. Choose a Question, Answer to which only you know. or add any other Unique answer which nobody knows but make sure you are able to remember it.
  • Add People as Friends that you know personally, Many a times people on facebook adds many other people who they dont even know by thier face. Facebook Asks you to identify Friends in which they are Tagged in.
  • Turn on Notification when you log in to your facebook account, so whenever you login, you get a mail from facebook with information about time, date, Operating system and Browser.
  • Change your Password Frequently, It is said that you must Use your  Password as your Toothbrush. So keep changing it Frequently to Prevent Fb Accounts from Being Hacked
So these were some Basic Tips that Facebook users must Consider in order to keep thier facebook account secure and safe. i hope this helps.

Gadget