Best Tips Secure Facebook Account From Hackers

Best Tips Secure Facebook Account From Hackers
How To Secure Facebook Account From Hackers
The excessive use use of internet can be directly linked with the boom in social networking sites. Whenever we mention the word “social network”, the first name that pops up in our minds is Facebook. Today, Facebook is the king of social media websites. It has millions of active users and a whole lot of features. People love to spend hours on Facebook, chatting with friends, sharing photos, status and check in’s along with videos and locations every day. Facebook provide huge stuff which increased chances of any vulnerability. Few bugs are interesting and useful which enhance Facebook user experience.But the huge user base of Facebook has attracted many hackers and sniffers to hack Facebook account for valuable personal information. If you are a Facebook user, you must be very careful as a Facebook profile contains personal sensitive information and photos of your loved ones. Facebook messages are also full of details. So if you want to make secure Facebook account from hackers, here are the best tips & tricks that you need to keep in mind.

How To Make Secure Facebook Account From Hackers.

Given below are the most important tips and tricks to make secure Facebook account from hackers. Users should follow all of them to make their accounts secure against hacker attacks.

1. Update Email Account.

Most users either forget the email connected with their Facebook account or loose access to it because they do not check their email. Your email account linked to Facebook is very important. In case of any hacking attack or suspicious activity, Facebook uses your email account to verify your identity and give you access to your account. Hence, it is very important to keep an up to date active email account linked to Facebook. Steps to link and update your email account are :
  • Click on the “Down Arrow” on top right to open a drop down menu.
  • Select Settings and in general tab, click on ‘Edit’ for the contact section.
  • Here you can add your email account as well as delete an older one. And click on ‘save changes’.
update facebook email

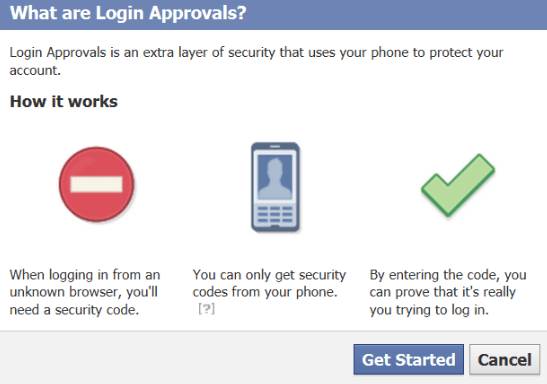
2. Set up “Log in Approvals”.

If you worry about someone accessing your account or a Hacker stealing your log in details, you must activate log-in Approvals. It works like 2 step verification where users need to enter a one time code along with the username and password make secure Facebook account from hackers.
Steps to set up log in Approvals are :
Settings > Security > Login Approvals > Edit.
log in approvals facebook

3. Code Generator For Facebook.

To make your logins even further secure on Facebook, you can use the Facebook code Generator app. This app generates one time codes for secure login. You can download it from the link given below. This feature can be directly accessed from the android app for Facebook.
Download From PlaystoreNote: It is available only for Android now.
code generator facebook android

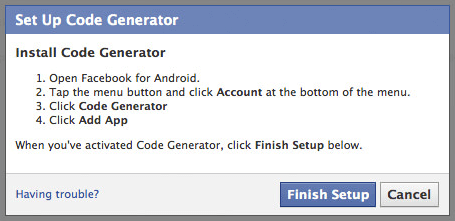
4. Kill Active Sessions.

A lot of Facebook intruders attack on Facebook accounts left open at public devices. Hence if you worry about your account open in certain devices, you can try this tip to secure your Facebook account. Steps to kill active sessions are :
Account Settings > Security > Active Sessions > End Activity.
kill active sessions facebook

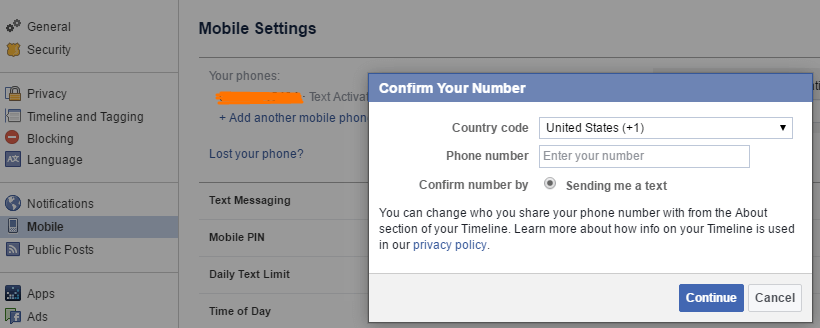
5. Link Your Mobile Number.

Believe it or not, a verified mobile number is a huge help in make secure Facebook account from hackers. Facebook users usually are under the myth that putting phone number on Facebook is risking their security. But they don’t know that you can link Facebook account to your mobile and hide the number in public info. This enables the user to use many security features on Facebook also including the ones mentioned above. Steps to link your phone number are :
Account Settings>Mobile>Add a Phone.
add mobile number facebook

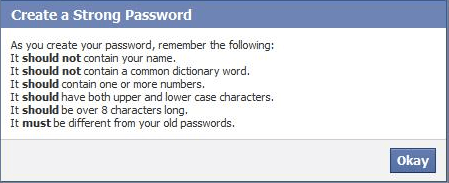
6. Use A Strong Password.

No matter what you do, setting a strong password with alpha numeric characters along with symbols is a great help in making your Facebook account secure from hackers. A strong password is difficult crack or interpret in case encrypted data gets breached.
strong facebook password

7. Log in alerts.

Yet another easy to follow method to secure your Facebook account from hackers is by enabling log in alerts. This feature sends you a Facebook notification whenever there is a new log in to your Facebook account. If the log in was not from you, you can take action by directly opening the notification.
  • To enable log in alerts, go to settings, and under security tab, click on edit for login alerts section.
login alerts facebook

8. Recognized Devices.

The devices that you use regularly are added to recognized devices and Facebook is less suspicious about the activity from these devices. Hence, it doesn’t show security notifications for these devices. It is important that you check if there is an unknown device on your list of recognized device on Facebook. You can monitor your list of recognized devices by heading to Settings > Security > Recognized devices > edit.
recognized devices facebook

9. Set Up Trusted Contacts.

Facebook offers users to set some trusted members as trusted contacts. These contacts are used as a verification method in case there is a breach of security in your Facebook account. We recommend every Facebook must setup this feature to secure Facebook account. This is a very important step in case the security of your device is ever compromised.
add trusted contacts facebook

10. Use Privacy Settings.

Facebook offers a number of security settings and features so you can be safe online. With a few tips, you can secure all your information present in your Facebook account. To do so, head to settings and then privacy.
facebook privacy review settings

Here you will find options like :

1. Who can see my stuff?
Here you can control the audience for your posts and status updates.
You can review and change audience for existing posts as well as limit them to certain people.
2. Who can contact you?
Here you can set who can send you a friend request. You can set it to friends of friends or everyone.
3. Who can look you up?
These settings change how people can search you on Facebook. You can select here if people can search you via email, phone number or via external search engines like Google.
  • Another way to control access to personal info on Facebook is changing the privacy options of the info you provide on your timeline and about section. Doing this is very easy as all you have to do is open the info section that you want to control, click on the drop down arrow on top right and open “privacy”. For example you can go to your timeline and do the above steps in order to hide your friend list.
privacy options on timeline

Other Tips to Secure Facebook Account.

11. Don’t open Spam Links.

We all know internet is full of spam and fake links. These links may sometime lead to a fake website that may look like Facebook website and also steal your log in details. These links can be very dangerous and hence must always be avoided. Make sure that the URL is only https://www.facebook.com and nothing else. Be very careful of fake phishing websites.
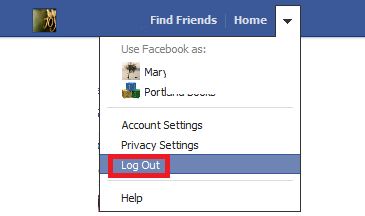
12. Always Log Out.

To save your Facebook account and make it secure against hackers, always log off your Facebook account after you are done browsing. It also makes your account secure. Leaving your account logged in makes it prone to attacks and intruders.
log out facebook

13. Use Incognito Or Guest Modes.

When you access Facebook on a browser, it leaves a huge amount of data in the form of cookies, cache and much more. Some of the browsers even save your log in details automatically. Hence, whenever Facebook users access their accounts on a public device, we always recommend using private mode or Incognito mode. This mode deletes all your browsing information once you close the tab, making your Facebook session very secure.
In conclusion, these are the best tips and steps to make your Facebook account secure against hackers. If you have any questions, or any suggestions for us, then feel free to share it with us in comments below.

How To Install Linux On VirtualBox In Windows 7, 8, 10

How To Install Linux On VirtualBox In Windows 7, 8, 10
How To Install Linux On VirtualBox
Linux is popular open source operating system that is available for free on the internet. Linux has many features like multitasking, multi-user, multi-threading, multi-processing, virtual memory support etc. Due to above Linux features, most people also prefer Linux in parallel to regular operating systems. Linux even has many flavors like “Kali Linux”“Ubuntu”“Backtrack”“Solaris” etc. Sometimes a user wants to use the functionality of two or more operating systems at the same time. But our computer can’t run two OS at the same time no doubt we can dual boot windows and Linux. But if you want to use two operating system in parallel then “Virtual Box” is the best option. A virtual box is software tool that allow you to install another operating system in parallel to your regular operating system and allows you to work on both operating systems at the same time.  If you do not know how to install Linux on virtualbox then do not worry because in this article we will explain the method to install Linux in virtual Box.

How To Install Linux On VirtualBox In Windows.

Follow the steps given below to install Linux on windows using Virtualbox machine and both operating system simultaneously.

Steps Install Linux On VirtualBox:

Step 1. Download VirtualBox from its official Website. Download the correct version for your operating system.
Download buttonStep 2. There are multiple choices for Linux versions. Choose the package that matches your Linux distribution, or use the “All distributions” option if your Linux distribution is not listed.
Step 3. Install the VirtualBox program. If you are using Windows, double-click the setup file and follow the prompts to install. For Mac open the DMG file that you downloaded and drag the VirtualBox file to your Applications folder.
install oracle vm virtualbox
Step 4. Double click to start the program. We can run VirtualBox directly from the installation program, or we can start it from the desktop icon. It is easy to make a desktop icon.
Step 5. After the installation of virtual box machine take place click the “New” button. This will open the wizard that will guide you through the process to create your first virtual machine.
Step 6. In the next wizard we have to choose a name for our virtual machine to uniquely identify it and also select the type of operating system to be installed.
linux os installation settings virtualbox
Step 7. Next step is to set the amount of RAM. VirtualBox will automatically choose the  minimum amount of RAM for the operating system we selected. It is not recommended that you set the max amount of RAM.
select memory size for virtual machine
Step 8. Then, next step is to create a virtual hard drive. Virtual Box will automatically set a recommended size based on the operating system, but you can set it to whatever you like.
create virtual hard drive for vm
Step 9. Check the specifications for your operating system to see how much space you should allocate at minimum. Then, click on the “create” button. Now your virtual machine is created.
Note:- Remember that any programs you install will also take up space on your virtual hard drive, so plan accordingly. The most common format for virtual hard drives is “VDI (VirtualBox Disk Image)”.
Step 10. Click on start Button to launch your virtual machine. Every Time you have to select your machine before launching when you start the application.
virtual machine created linux virtualbox
Step 11. Start the operating system installation. Once the virtual machine has been configured, the wizard will then close and you will be taken back to the Virtual Box main window.
Step 12. Double-click your new machine in the left menu to start it up for the first time. A new wizard will then appear to help start the operating system installation.
Step 13. If you are installing from a disc, then insert it into your computer and select “Host drive” and the right drive letter from the drop-down menu.
run ubuntu in virtual machine
Step 14. If you are installing from an image file, then click the folder icon to browse through your computer for the installation image file. You can also use bootable pendrive and install it via boot options.
Step 15. Install the operating system after selecting the installation media, the operating system installation will begin.
Step 16. Then, after the installation  our virtual machine is ready to run. Simply double-click the machine in the left menu of the Virtual Box main page to start the virtual machine. The virtualbox will boot and load the Linux operating system.
lunix running on windows virtual machine
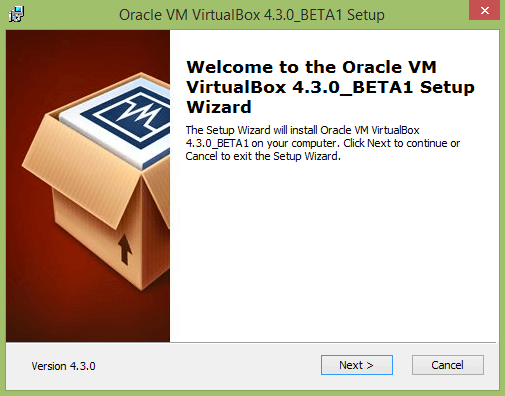
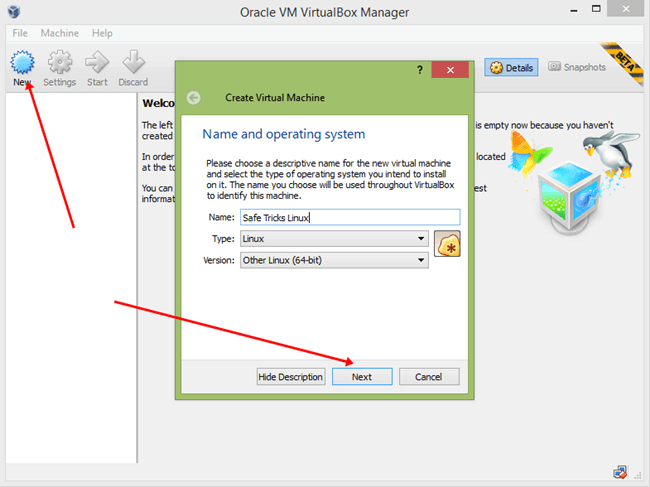
Now you can use Linux on your Windows PC as well as Mac along with another OS.
In conclusion, We hope you find the above guide on How to install Linux on VirtualBox Machine helpful. For any help or suggestion, feel free to write to us in comments below. Share the article with your friends as well.

How To Disable Charms Bar On Windows 8.1

How To Disable Charms Bar On Windows 8.1
How To Disable Charms Bar On Windows 8 Or 8.1
Today, Personal computers have found their way into all aspects of life. No matter if you are a student or a professional in any field, a computer is a must need everywhere. A very important component of a personal computer is its software. And ever since the boom in use of personal computers, Windows has been a primary Operating System all over the world. Windows is a GUI based Desktop operating system that runs on almost all computers of the world. Windows OS has evolved a lot from its earlier versions and now many people run Windows 8. The Windows 8 is a quite recent windows version if not the latest. It ditched the signature start menu in favor of a start tile screen. Windows 8 also brought many UI changes. Most users didn’t welcome these changes as one of the most hated feature of Windows 8 is the charms bar. Charms Bar appears on the right side of the screen when the mouse is dragged from there or the pointer hits the top right corner. It is annoying as most users accidentally turn it up and there is no way to turn it off using Windows settings. Hence, If you are a Windows 8 users, and are looking for a way to disable Charms bar on windows 8, or stop it from accidentally showing up again and again, we have a solution for you.

How To Remove Charms Bar On Windows 8.

Given below is the best way to get rid of he annoying Charms Bar in Windows 8. Follow the steps to remove Charms Bar from the right side of your screen.
remove charms bar windows 8

Steps To Disable Charms Bar On Windows 8:

Step 1. Download and install Classic Shell from the link below.
Download Now ButtonStep 2. Then, after installation Right click on the newly installed start button and select settings option.
Step 3. Click All Settings button and then go to “Windows 8 Settings” Tab.
Step 4. In this tab, tick the “All” option under “Disable active corners”
remove charms bar shell setings windows 8
Step 5. Click “OK” to apply these changes and you are done.
Hence, now you have successfully disabled the annoying Charms Bar in Windows 8.
Note : If you are still seeing the Charms bar Randomly popping up on the right side of your screen , try to turn off “Enable Edge Swipe” in “Control Panel > Mouse”.
In conclusion, this is the simplest and easiest guide on how to disable Charms Bar on Windows 8. For any help or assistance, feel free to contact us or write to us in comments below. Also, share with us your experience with Windows 8.

How To Unlock Pattern Lock On Any Android Phone By 3 Easy Ways

How To Unlock Pattern Lock On Android Phone
Android smartphones are famous world wide for having various kind of useful applications and games. Since we download apps that we need like we use messengers, photo editors, calling apps, launchers and other security apps. We have already listed out best android apps. Android is a functional OS but not as secure as it should be. As we can easily download paid android apps for free, Which show that android is probably not secure. Normally we use pattern lock to protect phone for others or we even use some applications. It is a very easy and simple way to secure our personal mobile phone data with pattern lock. We have to just draw a pattern and that’s it. As we don’t have to bother about putting numbers or characters for password. Because we can easily forget numbers and characters as compare to pattern lock, it is a very rare case that you may forget your pattern lock.
As usual we use gmail account in play store it become easy to reset but if you don’t have an email address to reset it. So don’t worry, those who forgot their android pattern lock can easily unlock pattern lock without losing their personal data. As all these patterns can easily bypassed just by doing some effort. We probably reset our phone to remove these pattern lock. But what about if we want to rather Unlock Pattern Lock On Android Without Losing Data? Don’t worry you are at a right place. Here we found some methods through which you can unlock pattern lock any of your android smartphone. We are going to explain different methods to unlock android smartphone pattern lock without losing data. So choose which you find out easy to do.

How To Unlock Pattern Lock On Android Phone.

Method 1:- Unlock Pattern Lock On Android Without Losing Data.

Required items.
  • Download Aroma File Manager.
  • A memory card for android device.
  • You android device either locked by pattern lock or password lock.
Step 1. After downloading Aroma File Manager, place it in your memory card (SD card). Then, insert the memory card into your locked android device.
Step 2. Open Stock Recovery Mode with reboot your android device and pressing Power Key and Volume up key simultaneously. Different phones may have different methods to open stock recovery mode so if you face any problem Google it.
Step 3. After entering into recovery mode use Volume+ and Volume- buttons to scroll up and down. For select use middle button.
Step 4. From there click on “Install Zip from SD Card” and give path to install “Aroma File Manager” from SD card.
Step 5. After installing, it will open in recovery mode.
Step 6. From the Aroma File Manager navigate to settings >> go to bottom and click on “Automount all devices on start” and then exit.
Step 7. Now again click on “Install Zip from SD Card” and give path to install “Aroma File Manager” from SD card.
Step 8. After this you will get “Aroma File Manager” opened again.
Step 9. Now navigate to Data Folder >> System Folder  and find >> “gesture.key” or “password.key” for pattern lock or password lock respectively.
Step 10. Delete that any one file and then exit aroma file manager and reboot your android device. After rebooting you will notice that password or pattern lock is not removed. But don’t worry draw any pattern and you will open your android device but remember or note that pattern because it will be saved.

Method 2nd:- Unlock Android Pattern Lock With SDK Tools.

1. First of all Download Android SDK and here we will show you How To download and install Android SDK Tools.
Android sdk tools interface
  • Download and install Android SDK Tools for run ADB commands. Open the given page and then select platform according to you download and install it.
  • After installing open it, unchecked the other packages and check Android SDK Platform-tools and then click on install packages according to the image given below.
Android sdk tools manager
2. So the other requirement is USB Debugging should be enabled before your android device was locked.
3. The process will probably not be helpful if you don’t have specific and compatible drivers for your phone. So you should be very careful While installing your device compatible drivers.

Steps To Unlock Android Pattern Lock.

Step 1. Connect your locked android phone with PC/Laptop via USB.
Step 2. Then, Open folder where you installed Android SDK Tools Users >> App Data >> Local >> Android >> Android-SDK >> Platform-Tools and then click on blank space hold shift and click right mouse button and select “open command window here”.
open command window setting
Step 3. It will open you command window. Then, you have to put some commands in the command window:-
For checking your device is connected or not put command:-

adb devices 
 Android sdk cmd settings to unlock pattern
Then, put these commands:-

adb shell
cd /data/data/com.android.providers.settings/databases
sqlite3 settings.db
update system set value=0 where name=’lock_pattern_autolock’;
update system set value=0 where name=’lockscreen.lockedoutpermanently’;
.quit
If above commands not working put:-
adb shell rm /data/system/gesture.key
Step 4. Once you done the above steps, you have to reboot your android device. Now its all done.
After rebooting your device you will see the pattern lock disabled.
So in this method USB Debugging should be enabled before lock because it is a must. If it is not enabled then you cannot proceed further steps.

Method 3rd:- Unlock Pattern With Factory Settings (Data Will Lost).

Since, in the above methods we have used PC/Laptop, we downloaded software and we usedsome commands. But if you do not have a PC/Laptop or your device did not have USB Debugging enable, then you can follow this method.
Note:- In this method your all data will be lost. So if you do not want to lose your data then don’t  follow this method.
Step 1. First of all, Switch off your Locked Android Device.
Step 2. Then, boot your Android device into “Recovery Mode” using specific keys by holding power key and volume up key simultaneously.
Step 3. After opening Recovery Mode
  • Select “Factory Data Reset” option and give “Yes“.
  • Select “Wipe Cache Partition” to wipe cache data.
Step 4. Then, Reboot your device.
Step 5. All Done ! hence, your device will start from the scratch.
In conclusion, we feel that you have learned some interesting facts about how to unlock pattern lock on android. But few people may use this to hack but you should rather use this in a right way to help someone, or yourself. If you have any question leave your comments below.


How to Create a Static Home Page in Blogger

When it comes to home pages, most websites can be divided into two: static and non-static. As their name implies, static home pages stay permanent no matter how many times the website is updated, while non-static home pages reflect the changes that are made to the site and show the latest posts first.

The latter has become well-known nowadays due to the rising popularity of personal and even corporate blogs. However, there are still many people who prefer static home pages because it makes their websites look more organized and professional. It also gives them more control over the readers' experience on their site and helps them create stronger brand awareness through the uniform message that their home page presents.

Fortunately, if you own a Blogger site and want to make your home page static, you'll find that creating one isn't as difficult as it seems. You can create a static home page in Blogger by taking these steps:

static pages in Blogger

1. Create your static home page

The first thing you should do is to create a new page for your blog. This will serve as your static home page but, for now, it will look and act like any other page in your site.

To make this page, you'll need to go to the main menu of the Blogger dashboard and click on the "Pages" option on the left side on the screen. Doing this will lead you to the "All Pages" menu window. Here, click on the "New Page" button and you'll enter an editor that looks similar to the Blogger Post editor that you use when publishing a new blog post. 

static home page

At the top box, enter the title that you want for this page - in this case, let's call it the "Welcome" page. In the larger text box, type the content that you want to appear on your home page; this can be a paragraph, or two about yourself or your business and what your site is all about.


Once you're done, click "Publish". The window will return to the main "All Pages" menu, and you'll see the new "Welcome" page you've created. Copy the URL of the "Welcome" page since you'll need it later on. To do this, right click on the 'View' link and select 'Copy Link Location' from the menu.


2. Redirect the default home page to the static one

Once your "Welcome" page is up, the next thing you should do is to change Blogger's default homepage. This involves redirecting from your site's original home page to the static homepage that you've created so it would be the first thing that people see when they visit your website.


To do this, you'll need to go to main Blogger editor menu, click on "Settings" on the left side of the screen, and choose "Search Preferences". Under the "Errors and redirections" section, you'll see the "Custom Redirects" option with an "Edit" link beside it. Click on the "Edit" link to open another window, where you'll see two boxes named "From" (with your blog's URL beside it) and "To".


In the "From" box, enter only a forward slash symbol "/". In the "To" box, paste the URL that you copied earlier and add the latter part of the URL of the "Welcome" page. For instance, the page's URL of our demo blog is static-home-page.blogspot.com/welcome.html, so we'll remove the "http://static-home-page.blogspot.com" address and add only "/p/welcome.html" in the "To:" box. The "/p" signifies that it's a static page.


Next, check the little box beside "Permanent", click on the "Save" text link, and press the "Save changes" button. Doing these will redirect your site's main URL to its new static home page. Access your blog on a separate browser to see if it works.


3. Make tabs for your site

If you're not planning to make tabs visible in your blog, you can stop at Step #2. But, if you want your site to have tabs that indicate the home page, the main blog page, and other pages you may have (such as the FAQs and Contact Us pages), you'll need to take another step.

Why is this important? Basically, when visible tabs are enabled in your site, they will show that you have two existing pages: the default home page and the new "Welcome" page you've created - both of which redirect to the same static page. This can be confusing for your readers and may even affect your search engine rankings.

To fix this, you first need to enable tabs by going to the "Layout" menu item and click on the "Add a Gadget" link. You can choose to add it below your blog header or sidebar. In many cases, it's advisable to add it below blog's header since they're more visible and give your website a sleek, professional look.


Once the pop-up window opens, scroll down and click on the 'Pages' link:


This will open another window named "Configure Page List". Here, under the "Pages to show" section, you'll see the default home page and your new static homepage with small boxes beside them. Uncheck the box beside the default home page to hide it from view, check the pages that you want to display in the menu and then click on the "Save" button to save the changes.


You can stop at this point but, if you want, you can also create a specific tab that will lead to your main blog post page. To do this, edit the "Pages" gadget that you just saved and click "+ Add external link".


On the new window that would open, enter the title you'd like for the page (such as "Blog") along with /index.html web address, then hit "Save Link" and click the "Save" button on the "Configure Page List" window. 


Now, view your site and you will see the pages menu containing the "Welcome" page and "Blog" tabs. To see how this works, you can also visit our demo blog. Enjoy!

Final Note

Having a static home page can be beneficial for your blog. Follow the steps above now to create a static home page in Blogger!

Gadget