CSS Rollover Image Effect - Change Image on Hover

Rollover image is a design feature where an image changes when your mouse hovers over it. Think of a light bulb that turns on and off when you move your mouse cursor into that area of a page. When a page is loading, rollover images are preloaded into it to ensure that the rollover effect is displayed quickly.

This used to be implemented using JavaScript, which is fairly easy with just a small amount of script involved. To make rollover images functional, onmouseover and onmouseout attributes are used to a link tag. The code is then added to a blog gadget or into a new post. It proved to have a number of disadvantages, however, which is why many web developers are using a CSS-only method.

css rollover image

How to create a rollover image using CSS

Here is how to implement a rollover image using CSS. Before getting started, we need to have two images ready, one in its initial/static state as well as its rollover state.

The Image

Place both the static and rollover image in one file and make sure that the rollover image is placed on top of the static one. To achieve the rollover effect, we'll write a code to display the static image and crop the hover image, so that only one image state is displayed at a time.

For this tutorial, we'll use the following as a CSS rollover image.

html rollover image

Creating an HTML Anchor Element for our Image

Instead of adding the image file in a <img> tag, we'll display it as a background image of an </a> (anchor) tag. Here's the HTML that we need to add:
<a class="rolloverimage" href="#URL">Rollover Image</a>
Note: if you want to make the image clickable, replace #URL with the url of the webpage where you want the link to point to.

Using CSS to Set a Background Image

To create the mouseover image effect, we'll use the :hover CSS pseudo-class. Then, we'll use the background-position property and set the values to 0 0 to move the background image to the upper left corner which will create the rollover effect. 
<style type="text/css">
.rolloverimage{
display: block;
width: 56px;
height: 90px;
background: url('https://blogger.googleusercontent.com/img/b/R29vZ2xl/AVvXsEhwLCIlLZWC02PHK3IOaF4SIl41kcsJa3GsZtH5bXRnWx4TVYU2IBfUJpw_bJ01Nh-ZoFhAtL0pP-6PqzonGGSS-3TAl4m7fIu-bJ6408bhMAPStsNQ9ZjKsQnO_Gr-qE5xOyoDwcFdzAZD/s180/rollover-image-light-bulb-on-off.png') bottom;
text-indent: -99999px;
}
.rolloverimage:hover{
background-position: 0 0;
}
</style>
Note: Replace the text in blue with the url of your image file. Please pay attention on the width and height values marked in red, these should be different depending on your file, where the height value is for only one image and not the entire image file!

The result

Hover your mouse cursor over the light bulb to see the rollover image effect in action:

Rollover Image

Adding Rollover Image to Blogger

To add the rollover image as a gadget: copy both the HTML/CSS codes and go to 'Layout', click on the 'Add a Gadget' link > select HTML/JavaScript, then paste the codes in the 'Content' box.

Or, if you want to add it inside one of your posts, when you create a New Post, switch to the 'HTML' tab and paste the codes inside the empty box.

And this is how you make images swap on mouseover using CSS. Enjoy!

Top 10 Killer Tips to Improve Page Rank

Page rank is based on an algorithm that determines how close your link is to the query that was put into a search engine such as Google. The more important your link is shown to be, the higher it will be ranked on search results pages. The result is that web traffic increases to the links that are ranked at or near the top.

How the Page Rank is Calculated?

The calculations used by the algorithm that determines page rank includes the number of links that are connected to your site. That includes inbound, internal, external, do-follow, and no-follow links along with backlinks. To increase your web traffic, you need to improve page rank so that it pulls in more people who are likely to purchase the products or services that you offer.

Here are 10 killer ways to improve page ranking so that more people will start visiting your website.

How to Improve Page Rank?


improve page rank

Submit Site to Web Directories

A simple, but very effective way to increase web traffic is adding more high quality backlinks. This can be done simply by submitting the content to respected web or article directories. They provide a great way for more people to see your content. Some good directories include the following:
By finding the right articles and web directories, you can quickly improve your page rank for your content.

Post Regularly

Google like sites that post on a regular basis, so set up a schedule where you have new, fresh content for your site on a daily or weekly basis. Be sure to post on the same day or days each week which will help improve your overall ranking.

Improve Content

If the content is well written, informative, and unique, this will help increase the chance that readers will share it with others. The better the content is presented, the more likely it is to be shared and that will improve its page ranking.

Link Exchange

This is a well-known technique, but it still works. To get a higher page rank, you will need to get other sites that are ranked higher to link to your site. Therefore, you will automatically have good links that will help boost the ranking of your content. This means that you will need to appeal to those with higher ranked sites to agree to share their link with you.

Post on Other Sites

This is also called guest posting, it is another tried-and-true technique that helps you improve page rank. Find blogs that allow for guests to post so that you can receive two or three backlinks in return for what you have submitted. The key is to post on blogs that are in your industry or niche so that you can attract readers to your site.

Add Comments to Other Sites

In addition to posting articles, you should also comment regularly on articles posted on other sites. You will need to set up a schedule so that you can comment on a consistent basis on posts that are in your niche or industry. The more you post, the more active you are in the community which means that more your site will grow in status. While most sites today have Disqus installed which means that a link to your site is automatically posted, others still use the Do-Follow which means you will need to include the link.

Increase Uptime

Be sure that you choose a web host that offers 99.9% uptime so that your website is available to anyone who wants to visit. Long downtimes can significantly cut into your web traffic, so be sure to choose a provider that is reliable and provides guarantees about uptime.

Social Bookmark

The social network is a great way to help increase the visibility of your content and improve page rank as well. By sharing your content on the best social sites, you will get more traffic thanks to the free backlink. Naturally, you’ll want to choose sites that are quite popular like the following;
  • Facebook
  • Google Plus
  • Pinterest
  • Reddit
  • Stumble Upon
  • Digg
  • Delicious
By sharing with good social media sites, you can increase page rank considerably. Plus, it will work for you over time to help bolster your site. Plus, be sure to be active on your social media sites by responding to questions so that potential customers will stay close to your efforts.

Multiple Pages

This is another old, but useful technique that can improve your page rank thanks to internal linking. Basically, you will need multiple pages that you link together for articles or content that is similar in nature. It takes a little work, but it is well worth it to see the results over time.

Research Popular Keywords

Focus on keywords that are the most common which means using words that people are most likely to use as queries on search engine sites. By using the most commonly searched keywords, you can help boost your page ranking significantly over time. This means having more visitors and better results when it comes to your sales.

In addition to these ten proven ways to improve page rank, you should also consider the power of advertising. By creating a simple banner and advertising with it on other sites, you can generate a lot of good backlinks which in turn creates more traffic for your page. Keep in mind that you should be active daily when it comes to blogs and forums that are in your niche as well.

Another small trick is to add a link to your signature in forums and emails, although you’ll want to avoid any illegal tactics that will put your website into trouble. By using proper techniques, you can improve page rank naturally which builds for your long-term success. After all, your goal is to be successful by increasing the ranking of your content. So, you should put in the time and effort to do things right to succeed.

Which methods do you use to improve page rank? Share with us in a comment below.

How To Make Single Name On Facebook Account

How To Make Single Name On Facebook Account
Facebook is place where we share each and every, day to day incident with our friends, family in chat or status updates. Facebook is the biggest social media site with millions of daily users just because it has thousands of different features which make Facebook amazing. So Developers keep trying to find bugs to make Facebook tricks and funny pranks. We have already posted few amazing tricks like invite all friends to Facebook page and many more. But Some of them are just spam which may lead to compromise your account. Thus, we always suggest each and every user to use tricks which are only provided by famous blogs. Always try them on Testing account first then on original ID. Now here we are going share another amazing trick to make single name on Facebook account. As per rule it is not possible to Make account on Facebook without Last name. But if you want to make your Facebook profile with First name without using last name then simply follow my given steps.

How To Make Single Name On Facebook Account. ?

To make this article more simple, we have divide this article into two parts so it will become easy to understand. In first part we will change our proxy settings for browser and in second part we make Facebook single name account. So follow both parts step by step carefully

 Part 1:- Proxy Settings For Browser.

Step 1. In case Your are not able to add proxy settings and facing any problem then i recommend to download Hola Better Internet VPN.
Step 2. Install Hola Extension in Firefox or Chrome and then turn ON Hola and search and select Country Indonesia. 
Step 3. It will automatically Implement proxy settings on your browser so you don’t need to add proxies manually. 
OR
Step 1. First of all to use single name on Facebook. We need to Add manual proxy settings in our browser. So we need to use Indonesian proxy Search it at Google or i recommend to find it from Proxynova.com or any other site of your choice. 
Step 2. If you have knowledge about Using proxy settings in browser then its good. If you don’t know how to add proxy then read How To Add Proxy Settings in Browser.

Part 2:- Settings To Make Single Facebook Account.

  • After doing proxy settings manually or by using Hola extension make sure it is working fine on Facebook.
  • Now its time to create single nameaccount.
  • Open your Facebook Account Settings.
  • Change your language to Bahasa Indonesia.
  • Then edit your current Facebook profile name and Simply remove Your Last Name. After that review your name and Save it.
  • After that your Facebook Account is only using First Name and you will see that Last Name Hide.
  • On Completing all steps, Remove Manual Proxy or Turn off Hola and change your language back to English (US) or other according to you.
Note:- Make Sure that You haven’t already changed your account name in last 60 days or otherwise you will not be able to make single name until you crossed 60 days time period. If you crossed name change limit then it is not possible try it on another account.
We think there is no need of any Proof because our Tricks is working from Aug 2012 and our 2M+ users successfully made single name through our blog 🙂
Pahul-Singh-single-name-facebook
If you face any problem regarding this trick feel free to share your comment, we will be glad to help you.

How To Change Proxy Settings On Chrome & Firefox Browser

How To Change Proxy Settings On Chrome & Firefox Browser
How To Change Proxy Settings In Chrome & Firefox Browser
Proxy and IP address are specific address based on different computer, location and internet connection. Proxies are helpful in many different situations sometimes we are not able or don’t have permission to access any specific website or other featured parts which are restricted in some areas or on specific device. Then by adding your own proxy you can easily access or complete any task you want to do. So for this purpose, this article is only for those who have never played with their browser settings. If don’t have knowledge about how to change proxy settings in browser then this tutorial with helps to learn about how to add IP address into browser and change your current internet surfing location.

How To Change Proxy Settings In Chrome & Firefox.

Proxy Settings For Mozilla Firefox.

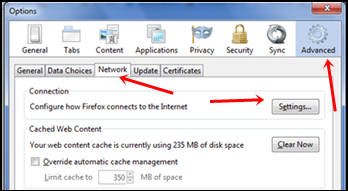
  • Open Your Mozilla Firefox >> Tools >> Options.
  • Now Window will appear choose Advanced Tab at last.
  • In Advanced Tab click on Network and click on Settings button of connection appear at first.
firefox network settings
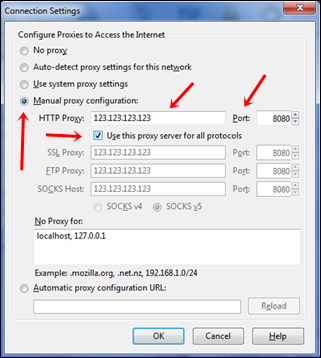
  • Then new window appear choose Manual proxy features and then your proxy in the place of HTTP box and also add Port no in the given box.
  • Just under the box of Proxy their is dialogue about Use this proxy for all protocols. Must check that box also if needed.
add proxy manually in firefox
  • Then save down your settings now your proxies are working fine.

Proxy Settings For Google Chrome and Other Browsers.

If you add proxy through Google chrome settings then it works not only for Google chrome also for all other browsers means proxy added through chrome work for whole internet connection.
  • Open Your Google Chrome Browser
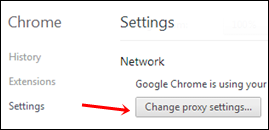
  • From top right corner click on settings button >> Then Settings from list.
  • New window will appear scroll down your mouse and click on Show Advanced settings.
chrome change proxy settings
  • Then Find change proxy settings appears in Network section.
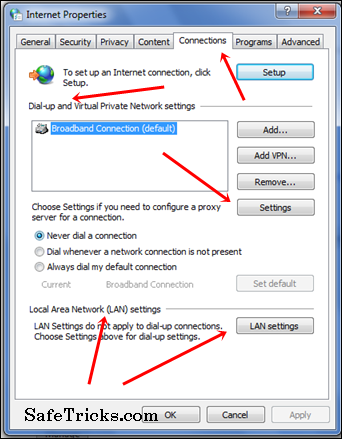
  • Then new window will appear of Internet Properties click on Connections tab.
  • In connection tab there are settings option for Dial up connection and for LAN connection.
  • If your connection is Dial up then select it from the dial box and its settings button is just in right side or box.
  • But if your connection LAN connection then click on LAN settings.
Internet property settings
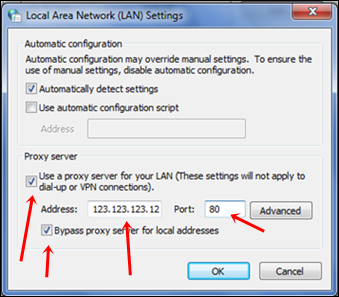
  • Tick the box use this proxy for LAN/Dial up connection under Proxy servers section.
  • Then Add your Proxy and port addresses.
  • After adding check the box of Bypass the proxy server for local settings option.
LAN add proxy settings
  • Now save down your all settings and proxies will start working.
These above settings are for Mozilla and Google Chrome but settings in chrome work for whole internet means no need to add manually in other browsers also.
Note:- In condition if you are not using Mozilla or chrome then for Manually addition proxy into device option your control panel and then find internet option same will appear as for chrome settings.
We hope you learn how to add proxy address into browser if you don’t know yet before then this topic help to learn something new. For any question, write to us in comments below.

How To Invite All Friends To Like Page On Facebook in Single Click

How To Invite All Friends To Like Page On Facebook in Single Click
How To Invite All Friends To Like Facebook Page
Facebook is one of the most popular social networking platform. Where we can create profile, Pages, groups and events to interact with people. Normally we use Profiles but for special causes, events or business we need to create page, group and event. It is not an easy task to grow page, group or any event. But the difficult task which we face is sending invitation to others to join our page, event or group. Suppose we have 5000 friends and if we take 1 sec for invite every person then we need approx 1,2 hours to complete this task. But don’t worry,
Today we are going to explain you the best way to invite all friends to like page on Facebook. This will help you to give tremendous growth to Facebook page likes and save time. We just need to install extension or even run a small script to invite all friends to like Facebook page. Which you can also use to invite all friends to Facebook event. But this method is only working to invite all friends to pages and events. For the group their is a separate which you can follow on add all friends to Facebook group. So here is the best way to invite all Facebook friends to like page.

How To Invite All Facebook Friends To Like Page.

Method 1:- Invite All Friends On Facebook Page (Chrome Extension).

  • First of all install Google chrome extension.
  • This extension will provide the feature to invite all Facebook friends by one click.
Add to Chrome
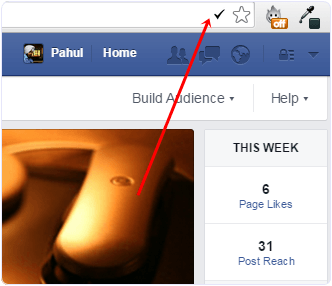
  • After the installation of this chrome extension small icon will start appearing on the top right side of the browser.
  • Button will only appear when you open Facebook website otherwise it will disappear.
Invite All Friends To Facebook Page chrome extension
  • Now login into account whose friends you want to invite to like facebook page.
  • After that open Facebook page and then click on the Invite all friend button.
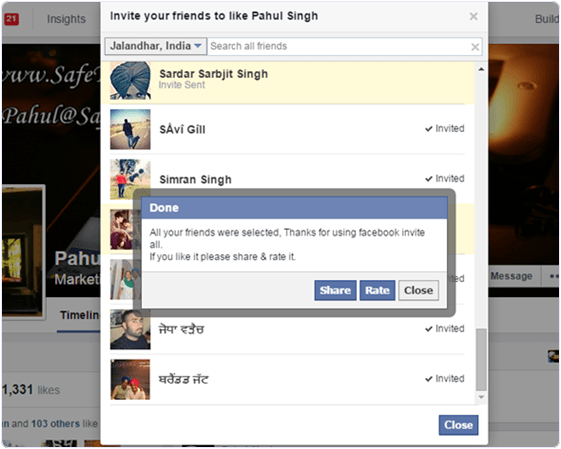
  • New pop up window will appear with name of all friends.
  • Then click on the icon of the extension which had installed.
Invite All Friends To Facebook Page chrome extension
  • After that just wait for few second your all friends invite automatically.

Method 2:- Invite All Facebook Friends To Like Page By Using Script.


  • First of all open your Facebook page where you want to invite friends.Then click on Invite all friends option and pop window will appear.
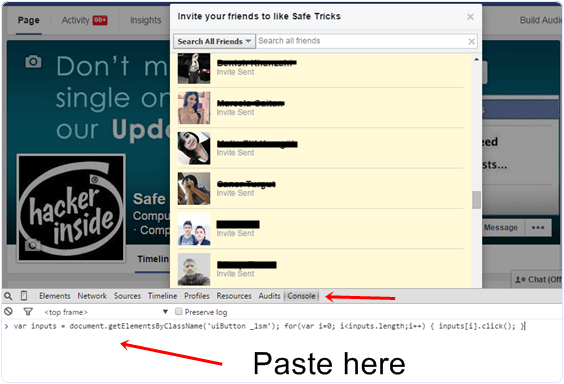
  • After that press F12 button on keyboard. Now console window box will appear.
  • Copy below code and paste them in console box.
var inputs = document.getElementsByClassName(‘uiButton _1sm’); for(var i=0; i<inputs.length;i++) { inputs[i].click(); }
  • After pasting above code into console box press button. Invitation to like Facebook page will be send successfully.
Invite All Friends To Facebook Page script codeIn conclusion, we hope that this simple yet effective guide on How to  Invite All Facebook Friends To Like Page will help you in getting popularity and attention for your page. For any help, assistance or query, please write to us in comments below.

AVG Antivirus For Android Review –Best Free Antivirus App For Mobile Protection

AVG Antivirus For Android Review –Best Free Antivirus App For Mobile Protection
AVG Antivirus For Android Review - Free Antivirus App For Mobile Protection
Keeping your phone safe is important, especially in the modern area when so much of your personal information is stored on your device. Email passwords, banking information, finances and sensitive personal data are all stored in files on your device to make usage easier. However, if you’re ever connected to the internet with your mobile phone, you’re at risk for this same information to be leaked to unwanted hands. That’s exactly why you need AVG Mobile Protection on your side.

Why To Use AVG Antivirus ?

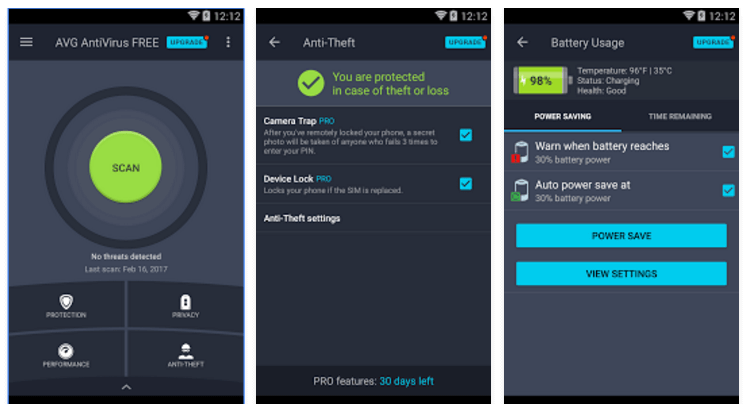
AVG Antivirus for Android is the top-rated free antivirus app to date and works hard to keep your phone protected from the many, many threats it faces each and every day. Whether it’s viruses and malware, slow operations due to bulky, unnecessary files, theft or simply snoopers, there are several inconveniences that AVG Antivirus can help to eliminate with services like:

Benefits Of Having AVG On Mobile.

• Realtime Protection:- The ability to scan for a wide range of viruses and malware and proceed with removal anytime, anywhere.
• Optimize Storage:- Options for cleaning up your smartphone and removing empty files, old call logs, outdated SMS messages and other unneeded bulk to make your phone run faster.
• Data Encryption:- A secure, encrypted file for you to keep your most important documents and pictures in to keep them safe from prying eyes and out of the wrong hands while you’re on the go.
• Device Optimization:- Optimizing your battery life, storage and more to make using your phone smoother, faster and overall less stressful.
• Banking Security:- The ability to lock sensitive files likes those concerning banking or other personal financial information so they can’t be accessed without a password.
• Data Stealing Protection:- The option to completely wipe your phone’s SD card in the event that it’s stolen.
Download From Playstoreavg screenshots android antivirus
Each of these options set AVG apart as the superior source for your mobile antivirus needs. Uncover these benefits and much, much more when you download the app for yourself free of charge and uncover how it can help boost your phone’s operations.

How To Recover Deleted Files From SD Card

How To Recover Deleted Files From SD Card
We use a lot of gadgets today. We depend on smartphones, tablets, digital cameras, DSLRs, MP3 players and many more for our tasks daily. All these devices offer many features and also have large storage options. This storage is possible due to SD cards. Almost all gadgets we use today use SD cards as their storage mediums. Hence our important data such as images, music, movies, videos and a lot more is stored in our tiny SD cards. Any users worst nightmare is when valuable data gets deleted from their SD cards. Users accidentally delete their important data from SD cards without backup or sometimes, format SD cards. If something like this has happened with you too, then do not worry. Here we have a complete guide to recover deleted files from SD card. We can recover almost all data deleted from SD card. We have explained step by step guide data recovery from memory cards.

How To Recover Deleted Files From SD Card.

Below is the step by step guide on how to recover deleted data from SD cards. Follow the steps carefully to restore deleted images, music, videos, documents and much more from your SD card.
Note:- We have used here EaseUS data recovery tool. There are a number of tools available that work the same and you can try them as well. Steps are also similar with minor feature changes.
Step 1. Download and install EaseUS data recovery tool from the link below.
Download buttonThe free version offers upto 2GB of data recovery and if you have more data kindly purchase the pro version.
Step 2. Connect your SD card to the computer.
Step 3. Launch the EaseUS data recovery tool and open the Data Recovery wizard.
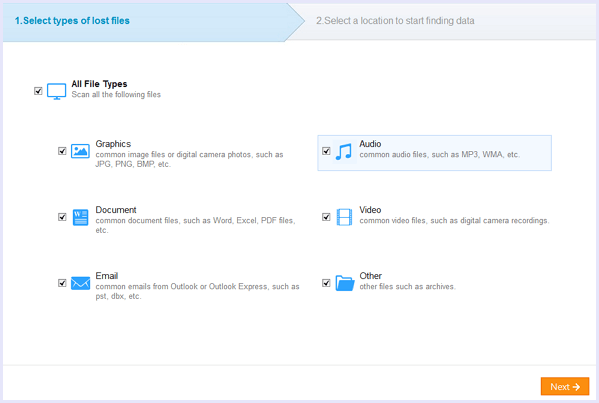
Step 4. Select the types of files that you are looking for on your SD card.
easeus recover sd card data select files
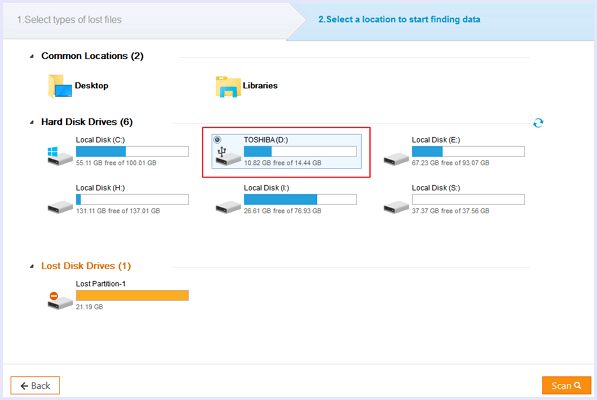
Step 5. Click on the scan button and select the storage of your SD card.
easus data recovery sd card
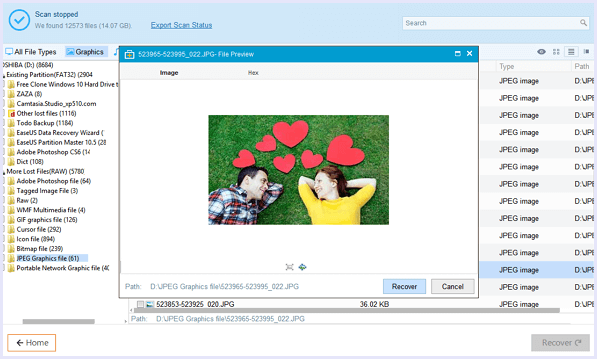
Step 6. After the scan is complete, you will be shown a complete list of deleted files found on your SD card.
Step 7. After finding the file you were looking for, click on the “recover” button to save it. Use local storage of the computer to save the recovered files instead of saving them in the SD card.
easeus data recovery scanned files
And this is how you can recover all your deleted files.
In conclusion, this is the best way to recover deleted files from SD card. In case you have any trouble or need any help, feel free to contact us and also wrote your suggestions in comments below.

Gadget